
 English
 русский
 عربى
عربى
A set of design, research and development, production, sales, installation in one of the professional new decorative materials enterprises.
Content
- 1 Nail or Glue Wall Paneling: The Direct Answer
- 2 Understanding the Different Types of Decorative Wall Panels
- 3 When to Use Adhesive for Decorative Wall Panels
- 4 When to Use Nails for Decorative Wall Panels
- 5 The Combination Method: Nail and Glue Together
- 6 Wall Surface Preparation: The Step Most People Skip
- 7 Nail vs. Glue: Side-by-Side Comparison by Panel Type
- 8 Choosing the Right Adhesive for Decorative Wall Panels
- 9 Common Mistakes to Avoid When Installing Decorative Wall Panels
- 10 Special Situations: Bathrooms, Basements, and Exterior-Adjacent Walls
- 11 Tools You Need for a Professional Decorative Wall Panel Installation
- 12 Final Verdict: Which Method Should You Use?
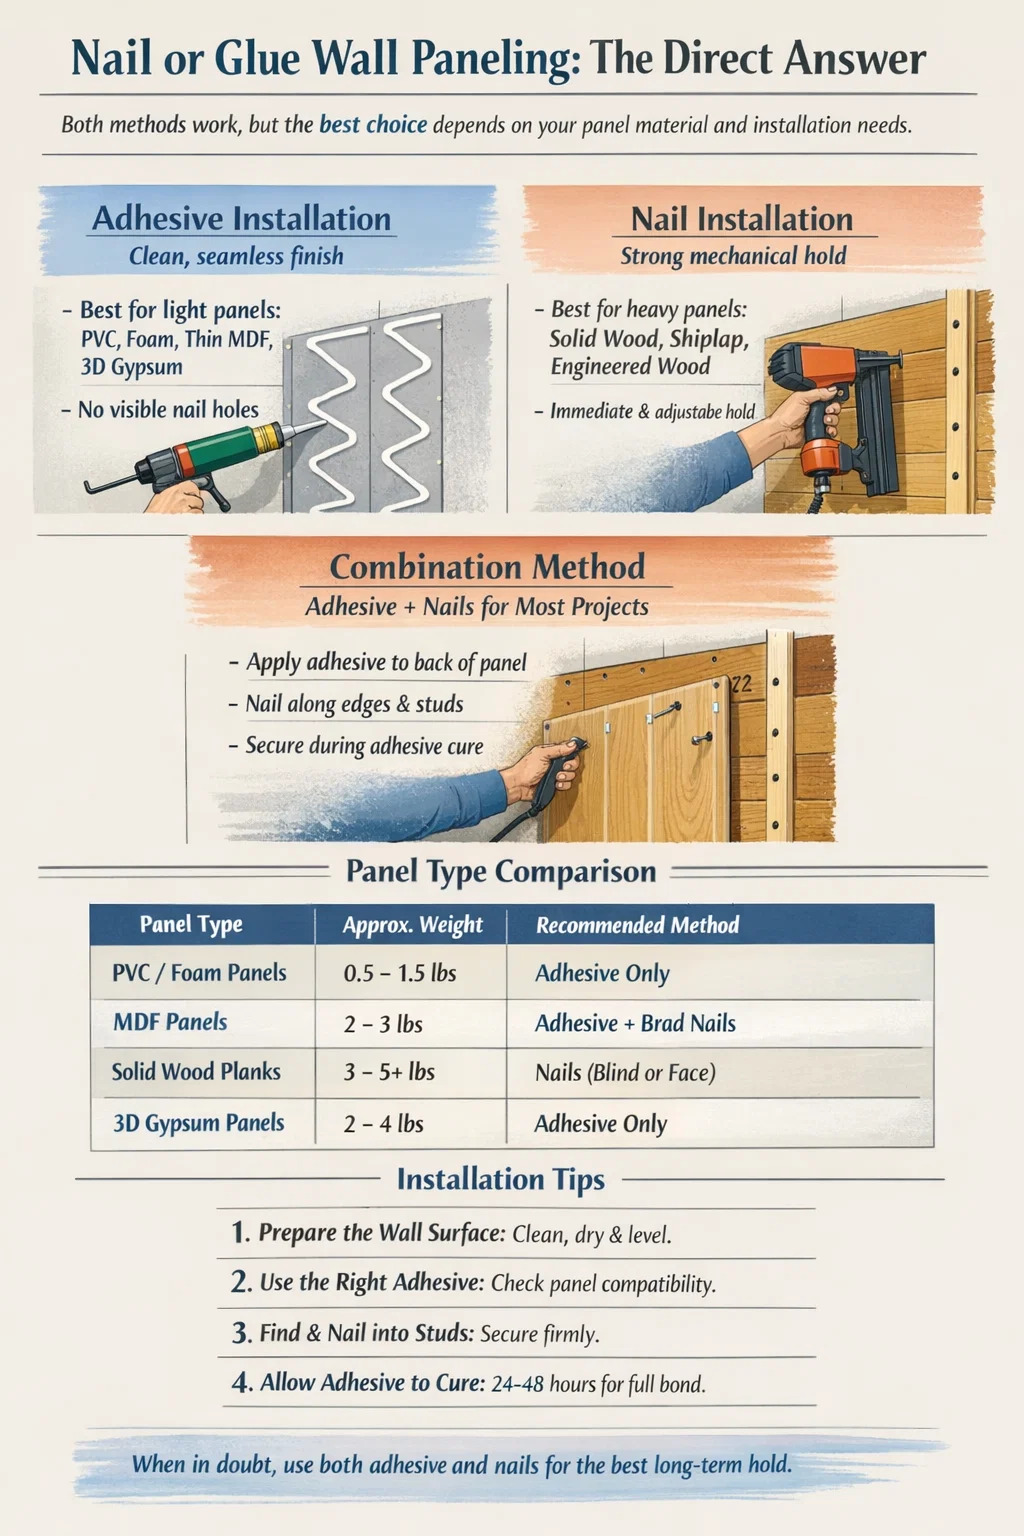
Nail or Glue Wall Paneling: The Direct Answer
The short answer is: both methods work, but the right choice depends on your wall surface, panel material, and whether you want a permanent or removable installation. In most professional installations, adhesive is the preferred primary method for decorative wall panels because it creates a seamless, fastener-free surface with no visible nail holes. However, nailing — or using a combination of nails and adhesive — remains the standard for heavier wood panels and structural applications.
If you are installing lightweight PVC decorative wall panels or thin MDF panels over drywall, construction adhesive alone is typically sufficient. If you are mounting solid wood planks, heavy tongue-and-groove boards, or paneling over an uneven surface, nails or screws provide the mechanical hold that adhesive alone may not reliably deliver over time.
Many experienced installers use both: adhesive to bond the panel face flat against the wall, and finishing nails or brad nails along edges and studs to hold panels in position while the glue cures and to add long-term security. This hybrid approach is widely regarded as the most reliable method for most decorative wall panel projects.
Understanding the Different Types of Decorative Wall Panels
Before you decide whether to nail or glue, you need to understand what type of decorative wall panels you are working with. Panel materials vary enormously in weight, density, flexibility, and surface compatibility, and these factors directly dictate which fastening method is appropriate.
PVC and Foam-Based Decorative Panels
PVC wall panels and foam-backed decorative panels are among the lightest options available, typically weighing between 0.5 and 1.5 pounds per square foot. Because of their light weight, these panels adhere extremely well with construction adhesive or panel adhesive. Nailing through PVC can crack or split the material if done without pre-drilling, and visible nail heads break the decorative finish. Adhesive-only installation is standard and recommended for these panel types.
MDF and Fiberboard Decorative Wall Panels
Medium-density fiberboard (MDF) panels are heavier and denser, often weighing 2 to 3 pounds per square foot for standard ½-inch thickness. MDF holds adhesive well but is also compatible with brad nails and finish nails. Most installers use a combination of panel adhesive and 1.5-inch to 2-inch brad nails for MDF decorative wall panels to ensure the panel stays flat against the wall during cure time and maintains a solid bond over the years.
Solid Wood and Engineered Wood Panels
Solid wood planks and engineered wood decorative panels are the heaviest category, potentially exceeding 4 pounds per square foot for thick hardwood boards. These panels typically require mechanical fastening — nails, screws, or a combination of staples and nails driven into wall studs. Adhesive alone is generally not strong enough to support heavy wood panels long-term, especially in humid environments where adhesive bonds can weaken. Face-nailing with finishing nails or blind-nailing through the tongue of tongue-and-groove planks are both standard techniques.
3D Textured and Gypsum Decorative Panels
Three-dimensional decorative wall panels made from gypsum, plaster composites, or rigid polyurethane are typically installed with adhesive only, as nailing through raised three-dimensional surfaces is impractical and would damage the decorative pattern. Tile adhesive, heavy-duty construction adhesive, or specialized panel mortar is used depending on the substrate. These panels can weigh between 1.5 and 4 pounds per square foot depending on material, so wall surface preparation and adhesive coverage are especially critical.
When to Use Adhesive for Decorative Wall Panels
Adhesive installation is the cleaner, faster option and the preferred method in the majority of decorative wall panel projects today. Here are the specific situations where adhesive is the right choice:
- You are installing lightweight decorative wall panels (PVC, foam, thin gypsum, or polyurethane) where nailing would crack or mar the surface.
- You want a completely fastener-free, seamless finish with no visible nail holes or plugs to fill.
- You are applying panels to a concrete, brick, or masonry wall where driving nails is difficult or requires special anchor hardware.
- You are working in a rental property or space where you need the option — however difficult in practice — to eventually remove the panels without leaving large holes.
- The decorative panel has a three-dimensional or highly textured surface that makes mechanical fastening impractical.
- You are installing panels in small sections or accent areas where the wall surface is flat, smooth, and in good condition.
The most commonly used adhesive for decorative wall panels is construction adhesive, sold in standard caulk tubes and applied with a caulk gun. Products such as Liquid Nails Heavy Duty, Loctite PL Premium, and similar panel adhesives are rated to hold panels against vertical surfaces with bond strengths often exceeding 1,000 pounds per square inch (PSI) once fully cured. Cure time varies by product — most require 24 to 48 hours for a full bond, though initial tack is sufficient to hold panels in place within 15 to 30 minutes.
For very heavy panels or masonry substrates, tile adhesive or epoxy-based adhesives may be more appropriate. Always check the panel manufacturer's recommendation for compatible adhesive types, as some materials — particularly certain PVC or foam formulations — can react negatively to solvent-based adhesives and should only be used with water-based or neutral-cure products.
When to Use Nails for Decorative Wall Panels
Nailing is the traditional installation method for wood wall paneling and remains the preferred approach in several practical scenarios. Nails provide immediate mechanical holding power with no wait time for adhesive to cure, and they allow you to make adjustments to panel alignment before fully setting the fastener.
- You are installing solid wood tongue-and-groove planks, shiplap, or heavy engineered wood decorative panels where adhesive alone would not provide adequate long-term support.
- The installation is over an uneven wall surface where panels need to be pulled tight against high spots and held in place mechanically.
- You are nailing through the tongue of tongue-and-groove panels (blind nailing), which hides the fastener completely behind the groove of the adjacent board.
- You want a faster installation without waiting for adhesive cure times — a nail gun can significantly speed up large projects.
- You are installing decorative wall panels over furring strips or a wood framework where driving nails into a solid wood substrate is easy and reliable.
- You need to be able to remove and replace panels in the future, such as for access to plumbing or electrical work behind the wall.
For most decorative panel nailing applications, 15-gauge or 16-gauge finish nails or 18-gauge brad nails are the standard choice. Nail length depends on panel thickness: for ¼-inch to ½-inch panels, 1.5-inch nails are typically sufficient to penetrate the panel and bite into the stud or backing board. For thicker solid wood planks, 2-inch to 2.5-inch nails are more appropriate. Always nail into studs or furring strips — nailing only into drywall paper does not provide adequate holding power for decorative panels of any significant weight.
When face-nailing decorative panels, set the nail head slightly below the surface with a nail set tool, then fill the recess with wood filler or color-matched putty. Sand flush once dry and touch up with finish or paint. This process adds time but produces a clean, professional result.
The Combination Method: Nail and Glue Together
The most reliable installation approach for the majority of decorative wall panel projects is to use both adhesive and nails in combination. This is the method recommended by most panel manufacturers for MDF, wood composite, and engineered wood decorative panels. Here is why it works so well:
Construction adhesive grabs the entire back face of the panel and bonds it flat against the wall, eliminating gaps, preventing warping, and distributing load evenly. However, construction adhesive takes time to reach full cure strength — typically 24 hours or more — and panels can slip or sag before the adhesive fully sets. Finishing nails or brad nails driven along the panel edges and at stud locations hold the panel firmly in correct position during cure time. After the adhesive cures, the panel has both a strong bond and mechanical fasteners, making it nearly impossible to remove without damage — which is exactly what you want for a permanent decorative installation.
A standard combined-method installation process looks like this:
- Apply construction adhesive in vertical beads or an S-pattern across the back of the panel, keeping adhesive approximately 1 inch from the panel edges to prevent squeeze-out.
- Press the panel firmly against the wall, aligning it carefully. Press and hold for 30 to 60 seconds to ensure initial tack.
- Drive finishing nails or brad nails along the top and bottom edges and through the panel face at stud locations — typically every 16 inches on center.
- Set nail heads below the surface and fill with matching filler or putty once the adhesive has cured.
- Allow the adhesive to fully cure per manufacturer instructions before applying any finish coats, caulking joints, or adding trim.
Using this combination approach, decorative wall panels will remain flat, tight, and secure for many years even in environments with seasonal humidity and temperature fluctuations — conditions that can cause adhesive-only installations to fail at the edges over time.
Wall Surface Preparation: The Step Most People Skip
Regardless of whether you choose to nail or glue your decorative wall panels, surface preparation is the most important factor determining whether your installation succeeds or fails. Poor surface prep is the leading cause of adhesive bond failure in decorative wall panel installations.
Cleaning the Surface
Wall surfaces must be clean, dry, and free of dust, grease, and loose paint before any adhesive is applied. Painted walls should be wiped down with a tack cloth or a damp cloth followed by a dry cloth. Kitchen walls especially tend to accumulate grease and cooking residue that will prevent adhesive from bonding to the painted surface. For walls with peeling or flaking paint, scrape off all loose material and sand smooth before proceeding — adhesive bonded to a flaking paint layer will fail along with the paint.
Checking for Flatness
Use a long straightedge or level to check the wall for flatness. Gaps between the straightedge and the wall surface larger than ¼ inch indicate a wall that is too uneven for adhesive-only installation. In these cases, either apply joint compound to build up low spots (allow to fully dry and sand flat), install a layer of furring strips to create a new flat mounting surface, or switch to a nail-only installation into the furring strips where you can shim behind panels to compensate for wall irregularities.
Priming Porous Surfaces
Unfinished drywall, new plaster, and raw concrete are highly porous and will absorb construction adhesive rapidly, potentially starving the bond before the panel can be positioned. Apply a coat of drywall primer or PVA primer to these surfaces and allow it to fully dry before applying panel adhesive. This seals the surface porosity and ensures the adhesive remains at the bond interface rather than soaking into the substrate.
Acclimating the Panels
Wood-based decorative wall panels — including MDF, solid wood, and engineered wood — should be acclimated to the room's temperature and humidity for at least 48 hours before installation. Store panels flat or leaned vertically in the room where they will be installed. This prevents the panels from expanding or contracting after installation, which can cause buckling, joint gaps, or adhesive delamination. PVC and foam panels do not require acclimation but should not be installed in temperatures below 50°F (10°C), as most adhesives lose bonding effectiveness in cold conditions.
Nail vs. Glue: Side-by-Side Comparison by Panel Type
The table below summarizes the recommended fastening method for common decorative wall panel types, along with typical weight per square foot and key installation notes.
| Panel Type | Approx. Weight (per sq ft) | Recommended Method | Notes |
|---|---|---|---|
| PVC / Foam Decorative Panels | 0.5 – 1.5 lbs | Adhesive only | Use water-based adhesive; avoid solvent-based products |
| MDF Decorative Panels | 2 – 3 lbs | Adhesive + brad nails | Nails hold during cure; fill nail holes before finishing |
| Solid Wood / Shiplap Planks | 3 – 5+ lbs | Nails (blind or face) + optional adhesive | Must nail into studs; allow for wood movement |
| 3D Gypsum / Plaster Panels | 2 – 4 lbs | Adhesive only (tile adhesive or construction adhesive) | Nailing impractical on 3D surfaces; full adhesive coverage critical |
| Polyurethane 3D Panels | 0.5 – 1.5 lbs | Adhesive only | Lightweight; construction adhesive provides more than adequate hold |
| Engineered Wood Composite Panels | 2.5 – 4 lbs | Adhesive + finish nails | Combination method strongly recommended for large panels |
Choosing the Right Adhesive for Decorative Wall Panels
Not all adhesives perform equally across all panel materials and substrates. Using the wrong adhesive is one of the most common reasons decorative wall panels fail over time. Here is a breakdown of the main adhesive types and their appropriate applications:
Construction Adhesive (Solvent-Based)
Products like Liquid Nails Heavy Duty or Loctite PL Premium are solvent-based construction adhesives that deliver very strong bonds on wood, MDF, drywall, and masonry. They are the go-to choice for installing solid wood and MDF decorative panels. However, solvent-based adhesives can chemically attack PVC, foam, and some polyurethane panels, causing them to soften, warp, or delaminate. Never use solvent-based construction adhesive on PVC or foam decorative wall panels.
Water-Based Panel Adhesive
Water-based panel adhesives are safe for PVC and foam panels and provide good bond strength on drywall and painted surfaces. They dry slower than solvent-based products — typically requiring 30 to 60 minutes of initial set time before the panel can be safely released — and they have slightly lower ultimate bond strength. For lightweight decorative wall panels, this is rarely a concern.
Tile Adhesive and Mortar
For gypsum, stone-composite, or ceramic decorative wall panels, tile adhesive (mastic or thin-set mortar) is the appropriate choice. Tile adhesives are formulated to bond dense, heavy materials to wall substrates and maintain a strong bond in humid environments like bathrooms and kitchens. Apply with a notched trowel for even coverage. Back-buttering the panel — applying adhesive to both the wall and the back of the panel — is recommended for panels heavier than 2 pounds per square foot.
Double-Sided Tape and Peel-and-Stick Products
Heavy-duty double-sided mounting tape is sometimes marketed for decorative wall panel installation in rental-friendly or damage-free applications. Products like 3M VHB tape or Scotch Heavy Duty mounting tape can hold lightweight PVC or foam panels well in low-humidity environments. However, these tapes generally should not be used as the sole fastening method for panels heavier than 1 pound per square foot, and they may fail over time in humid environments or rooms with significant temperature swings.
Common Mistakes to Avoid When Installing Decorative Wall Panels
Even when using the correct fastening method, decorative wall panel installations can go wrong if basic installation principles are ignored. Here are the most frequent mistakes and how to avoid them:
Applying Too Little Adhesive
Insufficient adhesive coverage is a very common cause of panel delamination. For most decorative wall panels, apply adhesive beads spaced no more than 6 inches apart across the entire back surface of the panel. A single bead around the perimeter alone is not enough — the center of the panel will bow away from the wall, creating an uneven surface and allowing moisture to get behind the panel. Coverage should be a minimum of 50 to 60 percent of the panel back surface for reliable adhesion.
Nailing Only Into Drywall
Nails driven only into drywall — not into studs behind the drywall — provide very little holding strength. Standard drywall is only ½ inch thick, and a nail in drywall alone can be pulled out with minimal force. Always locate wall studs before nailing decorative wall panels and drive nails into studs wherever possible. Studs in most residential construction are spaced 16 inches on center, which means you should have a stud available at regular intervals across the wall.
Not Leaving Expansion Gaps
Wood and MDF decorative panels expand and contract with seasonal moisture changes. Installing panels tightly edge-to-edge with no gap results in buckling when the panels expand in high humidity. Most manufacturers recommend leaving a 1/16 to ⅛-inch gap between panels and at walls and ceilings, which is then filled with flexible caulk after installation. This gap allows movement without causing the panels to push against each other and deform.
Skipping the Plumb and Level Check
Starting the first panel not perfectly plumb or level causes every subsequent panel to be progressively further off. Room corners and ceilings are rarely perfectly square, so do not use them as your reference for alignment. Always use a level to establish a true vertical or horizontal reference line before placing the first panel. Investing 10 extra minutes at the start of the project setting your reference lines prevents hours of remediation work later.
Installing Over Moisture-Damaged Walls
Installing decorative wall panels over damp drywall, water-damaged surfaces, or walls with active moisture issues will result in adhesive failure, mold growth behind the panels, and structural damage to the panels themselves. Any sign of moisture — water stains, soft drywall paper, efflorescence on masonry — should be fully investigated, the moisture source remediated, and the wall allowed to dry completely before any decorative wall panel installation begins. A moisture meter reading of below 12 percent is generally considered acceptable for wood-based panel installation.
Special Situations: Bathrooms, Basements, and Exterior-Adjacent Walls
Certain installation environments place additional demands on your fastening method and material choices for decorative wall panels.
Bathrooms and High-Humidity Areas
Bathrooms are one of the most popular applications for decorative wall panels but also one of the most demanding in terms of adhesive performance. In wet areas like shower surrounds, only 100 percent waterproof panel systems should be used — typically PVC or solid acrylic panels. These should be installed with a waterproof panel adhesive or silicone adhesive, not standard construction adhesive. Joints must be sealed with silicone caulk, not grout. In general bathroom areas (outside the shower zone), moisture-resistant MDF decorative panels can be used with standard construction adhesive but require all cut edges to be sealed with primer or waterproof sealant to prevent swelling.
Basement Walls
Basement concrete or block walls are prone to moisture migration, which can compromise adhesive bonds over time. For decorative wall panel installations in basements, it is best practice to first apply a waterproof masonry sealer to the wall surface, then install the panels over pressure-treated wood furring strips fastened to the masonry with concrete screws. The panels can then be nailed or glued to the furring strips. This approach creates an air gap between the masonry and the panel that allows moisture to dissipate rather than accumulating behind the panels.
Exterior-Adjacent Walls
Walls on the exterior of the building — particularly in cold climates — are subject to greater temperature swings and potential condensation on the inside face. Wood-based decorative panels on these walls will expand and contract more than in interior applications. Use adhesives rated for wide temperature ranges and leave generous expansion gaps. In very cold climates, construction adhesive applied at temperatures below 40°F (4°C) will not cure properly — schedule panel installation during warmer periods or use a low-temperature-rated adhesive product specifically formulated for cold-weather application.
Tools You Need for a Professional Decorative Wall Panel Installation
Having the right tools on hand before you start makes the difference between a frustrating project and a smooth one. Here is what you need for a typical decorative wall panel installation:
- Stud finder: Essential for locating wall studs before nailing. Magnetic stud finders locate drywall screws; electronic models detect changes in wall density.
- Level (4-foot or longer): Used to establish reference lines and check each panel for plumb and level during installation.
- Caulk gun: Required for applying construction adhesive from standard 10-oz cartridges. A quality ratchet or smooth-drive caulk gun gives better control than a basic model.
- Brad nailer or finish nailer: A pneumatic or electric nailer is far faster and more consistent than hand-nailing and causes less surface damage to decorative panels.
- Miter saw or circular saw: For cutting panels to length and making angled cuts at corners.
- Jigsaw: For cutting around outlets, switch plates, and other obstructions.
- Nail set: For driving finish nail heads slightly below the panel surface before filling.
- Tape measure and pencil: For marking cut lines and panel positions.
- Notched trowel: Required when using tile adhesive for gypsum or stone-composite decorative panels.
- Painter's tape and temporary support: For holding panels in position while adhesive achieves initial tack, especially on smooth-surface panels without nails.
Final Verdict: Which Method Should You Use?
To bring it all together clearly: for the majority of decorative wall panel installations, using both adhesive and nails together is the most reliable approach. Adhesive alone is appropriate for lightweight PVC, foam, and polyurethane decorative panels where the panel material is incompatible with nailing or where a completely clean, fastener-free surface is required. Nails alone are appropriate for solid wood tongue-and-groove planks where blind nailing hides all fasteners, or for any installation over furring strips where adhesive bonding to masonry is not practical.
If you are using MDF decorative panels, engineered wood panels, or any heavy panel material on standard drywall, do not skip the combination method. The small extra effort of driving brad nails while the adhesive cures will produce a result that stays flat, stays bonded, and stays looking professional for many years. The adhesive does the structural work; the nails keep everything exactly where you put it while the adhesive reaches full strength.
Take the time to properly prepare your wall surface, acclimate your panels, choose a compatible adhesive, and locate your studs. A decorative wall panel installation done correctly on the first pass will outlast the house; one done incorrectly will be peeling off the wall and demanding re-installation within a few years.


 ++86-18906857262 / ++86-13754347028
 No.49, Tunnan Industrial Zone, Daohui Street, Shangyu District, Shaoxing City, Zhejiang Province, China