
 English
 русский
 عربى
عربى
A set of design, research and development, production, sales, installation in one of the professional new decorative materials enterprises.
Content
- 1 Yes, You Can Install Wall Panels Over Drywall — Here's What You Need to Know First
- 2 Why Decorative Wall Panels Are a Smart Choice for Drywall Surfaces
- 3 Types of Decorative Wall Panels You Can Install Over Drywall
- 4 Wall Preparation: The Step That Determines Whether Your Panels Stay Up
- 5 Installation Methods: Adhesive, Nails, Screws, or a Combination
- 6 Step-by-Step: Installing Decorative Wall Panels Over Drywall
- 7 Moisture and Humidity: The Factor That Trips Up Most DIYers
- 8 Common Mistakes to Avoid When Paneling Over Drywall
- 9 How Thick Are Wall Panels, and Does Thickness Matter Over Drywall?
- 10 Design Considerations: Getting the Look Right With Decorative Wall Panels
- 11 Cost Breakdown: What to Budget for a Wall Panel Installation Over Drywall
- 12 Frequently Asked Questions
- 12.1 Do I need to remove the existing drywall before installing wall panels?
- 12.2 Can I install wall panels over painted drywall?
- 12.3 Will installing panels over drywall cause any fire code concerns?
- 12.4 How do I handle corners when installing wall panels?
- 12.5 Can decorative wall panels be removed later without destroying the drywall?
- 12.6 How many square feet of panels should I order?
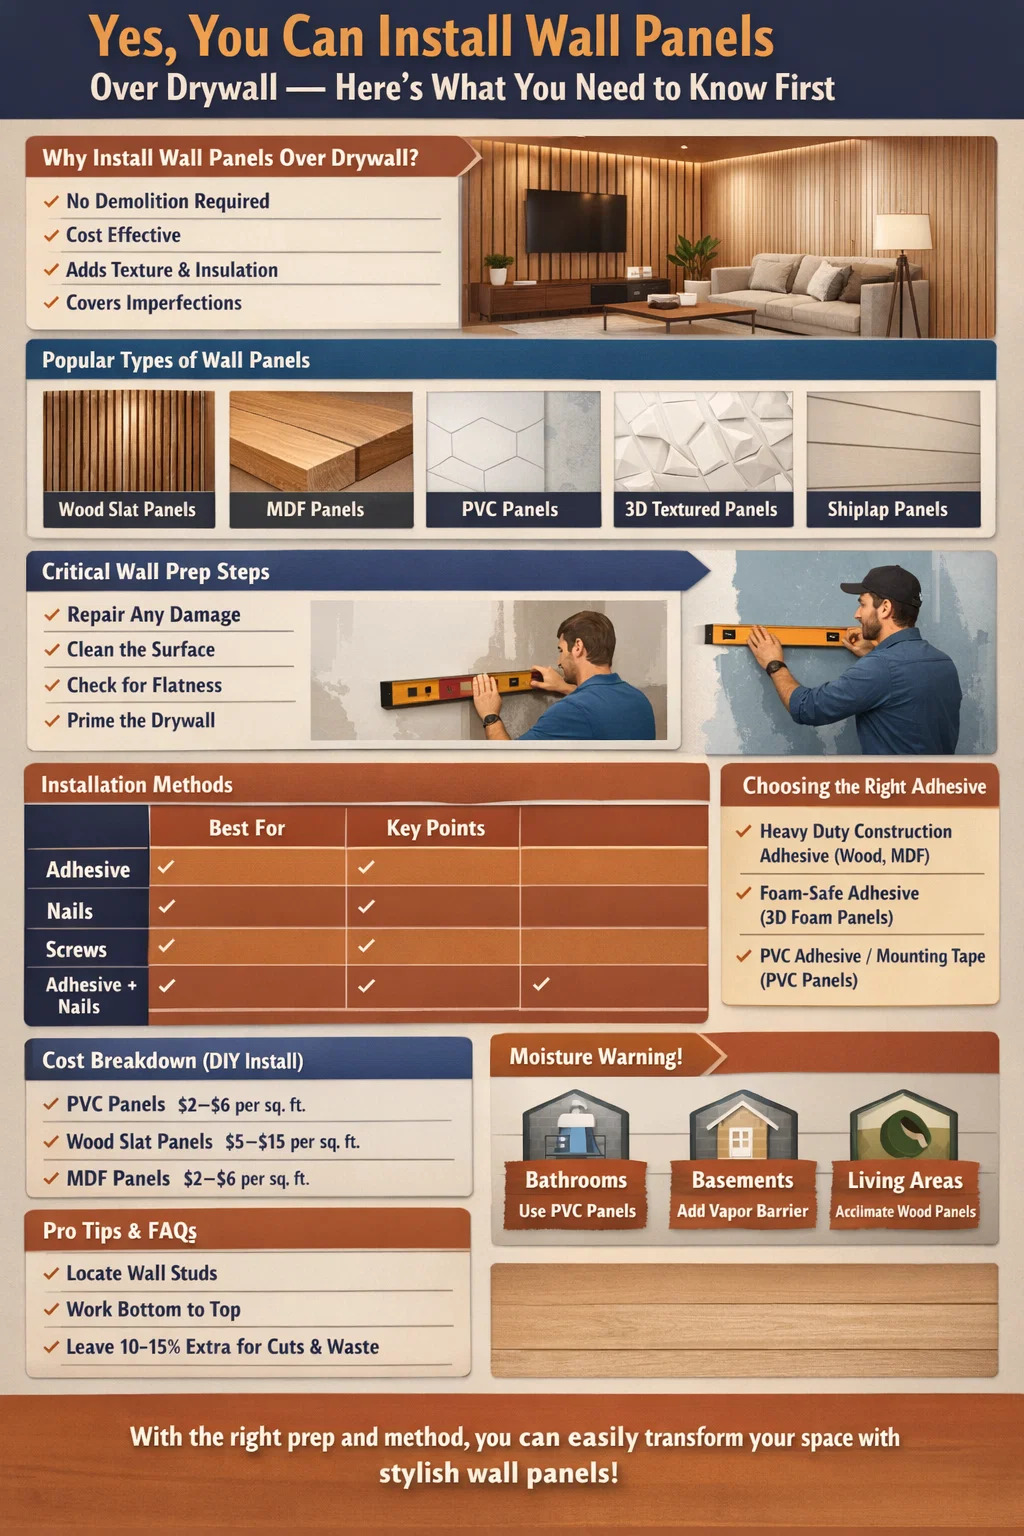
Yes, You Can Install Wall Panels Over Drywall — Here's What You Need to Know First
The short answer is yes — installing decorative wall panels over drywall is not only possible but one of the most popular home improvement approaches in both residential and commercial spaces. Whether you're upgrading a living room, home office, basement, or commercial lobby, wall paneling over drywall gives you a fast, cost-effective way to transform a flat surface into something with real visual impact — without tearing anything out.
That said, "yes you can" doesn't mean "any panel, any method, any surface." There are critical factors that determine whether your installation will look professional and last for years, or bubble, warp, and pull away from the wall within months. This guide walks through everything — from wall prep to panel types to adhesive choices — so you go in with a clear plan.
Why Decorative Wall Panels Are a Smart Choice for Drywall Surfaces
Standard drywall is functional but aesthetically neutral. It's smooth, paintable, and perfectly adequate — but it gives you nothing in terms of texture, warmth, or architectural character. Decorative wall panels solve that problem efficiently.
Here's why so many homeowners and contractors choose paneling over drywall replacement or full wall renovation:
- No demolition required. Adding panels on top of existing drywall avoids the mess, cost, and time of removing and disposing of old wallboard.
- Cost efficiency. A full drywall replacement with finishing, priming, and painting can run $2–$4 per square foot or more in labor alone. Installing decorative panels over drywall typically costs less in total material and labor when done DIY.
- Visual impact. Wood wall panels, 3D textured panels, slat panels, PVC panels, and shiplap all dramatically change the feel of a room in ways paint simply cannot match.
- Added insulation and sound dampening. Many panel types — especially wood and composite materials — add a small but meaningful layer of thermal and acoustic insulation to drywall walls.
- Conceals imperfections. Drywall with old paint, minor cracks, texture issues, or previous DIY repairs can be completely hidden under a paneled surface.
The versatility of modern decorative wall panel systems means there's a product suitable for virtually every interior, every style, and every budget.
Types of Decorative Wall Panels You Can Install Over Drywall
Not all panel types behave the same on drywall, and your choice of material will affect both the installation method and the long-term result. Below is a breakdown of the most common decorative wall panel categories used over drywall:
Wood Slat Wall Panels
Wood slat panels — sometimes called slatwall panels or vertical wood strip panels — have become one of the most-searched decorative panel types in the past few years. They consist of thin strips of real wood, engineered wood, or wood-veneer mounted on a felt or MDF backing. Installation over drywall is typically done using construction adhesive plus finish nails for security. Because they're modular and lightweight, they're highly DIY-friendly.
Key considerations: real wood slat panels are sensitive to humidity changes and should not be used in bathrooms or damp basements without a moisture barrier between the panel and drywall.
MDF and HDF Decorative Panels
Medium-density fiberboard (MDF) and high-density fiberboard (HDF) panels are among the most stable options for drywall application. They don't warp or expand significantly with temperature changes, making them suitable for most indoor environments. These panels are often used for wainscoting, accent walls, and grid or batten designs. They're heavier than PVC or foam panels, so proper fastening — including screw attachment into wall studs behind the drywall — is important for larger pieces.
PVC and Vinyl Wall Panels
PVC decorative wall panels are the go-to option for moisture-prone areas like bathrooms, laundry rooms, and kitchens. They're waterproof, lightweight, and easy to cut. Many are designed with tongue-and-groove or click-lock edges, which makes installation over drywall even more straightforward. They can be adhesive-mounted directly to the drywall surface and require no painting or sealing.
3D Textured Wall Panels
These panels — made from PVC, polyurethane, plaster, or plant-fiber composites — create dramatic three-dimensional surface designs including geometric patterns, wave effects, and organic textures. They're typically lightweight and adhere well to smooth drywall with standard panel adhesives. After installation, most are painted over to create a seamless, sculptural look.
Shiplap and Planking Panels
Shiplap — real or engineered — has maintained strong popularity for its farmhouse-to-modern design range. Installing shiplap over drywall is a standard practice, and it's done with nails (typically 2-inch finish nails) shot into the wall studs. A stud finder is essential. Nickel spacers between rows help maintain consistent gaps for an authentic look.
Acoustic Wall Panels
For home offices, media rooms, and studios, acoustic decorative wall panels serve a functional and aesthetic purpose. Made from compressed foam, fabric-wrapped fiberglass, or felt, these panels are typically mounted over drywall using Z-clips, impaling clips, or adhesive. Some products come with a pre-applied adhesive backing.
Wall Preparation: The Step That Determines Whether Your Panels Stay Up
This is where many DIY installations go wrong. Skipping or rushing wall prep leads to adhesive failures, uneven surfaces, and panels that bow or separate over time. Before any decorative wall panel goes up, your drywall surface needs to meet these standards:
Check for and Repair Damage
Inspect the drywall for holes, deep gouges, soft spots, or water damage. Soft or water-damaged drywall will not hold adhesive or screws reliably. Any water-damaged section should be replaced before paneling — installing over damaged drywall traps moisture and encourages mold growth behind your new panels. Small holes and cracks can be patched with joint compound and sanded smooth.
Clean the Surface Thoroughly
Adhesives require a clean, dust-free surface to bond properly. Wipe down the wall with a dry or lightly damp cloth to remove dust, dirt, and grease. If the wall has been in a kitchen or near cooking areas, use a degreasing solution. Any grease or silicone residue will significantly reduce adhesive bond strength.
Check for Flatness
Drywall walls are rarely perfectly flat. Use a long straightedge (6 feet or longer) to identify high spots and low spots. Gaps of more than 1/4 inch between the straightedge and wall surface will cause rigid panels to bridge the gap and crack under pressure, or to not fully contact the adhesive. High spots should be sanded down; low spots filled with joint compound.
Prime the Drywall Surface
If you're using construction adhesive to mount your panels, priming the drywall first significantly improves adhesion. Unprimed drywall paper is porous and tends to absorb adhesive before it can bond. A coat of drywall primer or PVA primer solves this. Allow primer to fully cure — typically 24 hours — before mounting panels.
Locate and Mark Wall Studs
Even when using adhesive as your primary mounting method, knowing where your studs are is essential — especially for heavier panels. In standard US construction, studs are spaced 16 inches or 24 inches on center. Use a magnetic or electronic stud finder and mark stud locations with light pencil lines that extend from floor to ceiling. This gives you a map for any supplementary nailing or screwing.
Installation Methods: Adhesive, Nails, Screws, or a Combination
The right installation method depends on the weight and rigidity of your decorative wall panels, and the structural requirements of your specific installation. Here's how the main methods compare:
| Method | Best For | Pros | Cons |
|---|---|---|---|
| Construction Adhesive | Lightweight panels (PVC, foam, thin wood veneer) | No visible fasteners, fast installation | Permanent, requires flat wall surface |
| Finish Nails (nail gun) | Shiplap, wood planks, slat panels | Strong hold, easy into studs | Requires stud access, small nail holes to fill |
| Screws into Studs | Heavy MDF, solid wood panels | Maximum holding strength | Visible unless countersunk and filled |
| Adhesive + Nails (Combined) | Mid-weight panels, accent walls | Best overall bond, accounts for adhesive cure time | Slightly more labor-intensive |
| Z-Clips / French Cleats | Acoustic panels, panels needing removal | Removable, level adjustment possible | Requires precise cleat alignment |
Choosing the Right Adhesive
Not all construction adhesives are compatible with all panel materials. Using the wrong adhesive can dissolve foam panels, fail to grip PVC, or dry too slowly on dense wood. Here are the most reliable options by panel type:
- Liquid Nails Heavy Duty or Loctite PL Premium: Excellent for wood, MDF, and most composite panels. Strong initial tack.
- Foam-compatible construction adhesive (no solvent/VOC): Required for polyurethane and EPS foam 3D panels. Solvent-based adhesives melt foam.
- PVC-specific adhesive or double-sided mounting tape (heavy duty): Some PVC panels work better with specialty tape products like 3M VHB tape, especially for lighter-weight panels in dry conditions.
- Panel adhesive in caulk tube: Standard for most wood and MDF panels; apply in a serpentine pattern and press firmly.
Apply adhesive in an S-pattern across the back of the panel, leaving 1–2 inches clear from all edges to prevent squeeze-out. Press the panel firmly against the wall, pull it away briefly (about 30–60 seconds) to let the adhesive become tacky, then press back and hold for at least 60 seconds. Prop or tape panels in place while adhesive cures if needed.
Step-by-Step: Installing Decorative Wall Panels Over Drywall
The following process applies broadly to most panel types, with notes on variations where relevant.
- Acclimate the panels. Wood-based panels should sit in the room they'll be installed in for at least 48–72 hours before installation. This allows them to adjust to the room's temperature and humidity, preventing warping or gapping after installation. Stack them flat or lean them against the wall with spacers between each panel for airflow.
- Measure and plan the layout. Start from the most prominent corner or focal point in the room. For accent walls, center the panel layout so any cut panels on the edges are equal on both sides. Mark a level horizontal reference line near the bottom of the wall using a long level — do not assume the floor is level.
- Cut panels to size. Use a circular saw or jigsaw for wood/MDF panels. Use a utility knife and straightedge for PVC and foam panels — score and snap for clean cuts. Always wear appropriate eye and respiratory protection when cutting MDF (fine dust is a health concern).
- Dry-fit panels before applying adhesive. Hold or temporarily tack panels in position to verify fit, alignment, and gaps. Adjust cuts as needed. This step catches problems before adhesive is involved.
- Apply adhesive or prepare fasteners. Follow the adhesive method appropriate for your panel type, as described above. For nail installations, load your nail gun and set depth so nails are just slightly countersunk.
- Install panels from bottom up. Starting from the bottom ensures lower panels support upper ones during installation. For the first row, use your level reference line. Check each panel for plumb (vertical level) before the adhesive sets.
- Maintain consistent spacing. For slat panels, shiplap, or planks, use consistent spacers — plastic tile spacers work well — to keep gaps even. For panels meant to be seamless, butt edges tightly.
- Work around outlets and switches. Mark the outlet position on the back of the panel using measurements from the wall edges. Cut the opening with a jigsaw or oscillating tool. Outlet box extenders may be needed if panels add significant depth to the wall.
- Finish edges and transitions. Use matching trim, corner molding, or edge strips to cap exposed panel edges at corners, ceilings, and floor transitions. This gives the installation a professional, finished appearance.
- Fill nail holes and caulk gaps. Fill countersunk screw holes with wood filler. Caulk any gaps between panels and trim with paintable latex caulk. Once dry, sand smooth and paint or finish as needed.
Moisture and Humidity: The Factor That Trips Up Most DIYers
Moisture is the number-one reason decorative wall panel installations fail prematurely. When moisture gets trapped between a panel and the drywall behind it, the results range from adhesive bond failure to mold growth to structural deterioration of both the panel and the drywall.
Here's how to think about moisture by room type:
Bathrooms and Wet Areas
Standard drywall is not suitable as a substrate for wall panels in wet areas like shower surrounds or directly behind tubs — use cement board or moisture-resistant greenboard in these zones. For general bathroom walls (not direct water splash areas), moisture-resistant drywall combined with waterproof PVC or composite panels is an appropriate combination. Seal all edges and seams with silicone caulk to prevent water infiltration from steam or splashing.
Basements
Basements present persistent humidity challenges. If the existing drywall shows any history of moisture (staining, efflorescence on the foundation wall, musty smell), address the root moisture issue before installing any paneling. A vapor barrier (6-mil polyethylene sheeting) between the foundation wall and any framing/drywall is standard practice. For decorative panels in basements, PVC, vinyl, or moisture-resistant composite panels are far safer long-term choices than solid wood or standard MDF.
Living Areas and Bedrooms
In climate-controlled living spaces, standard drywall is an excellent substrate for virtually any decorative wall panel type. The main precaution here is ensuring new wood panels acclimate to the indoor environment before installation, as described earlier. Homes with forced-air heat that create very low winter humidity (below 25–30% RH) can cause real wood panels to shrink slightly — leaving gaps that weren't there during installation. Engineered wood or composite panels handle this more gracefully than solid wood.
Common Mistakes to Avoid When Paneling Over Drywall
Learning from others' errors saves significant time and money. These are the most frequently reported issues from DIY and professional installations:
- Skipping acclimation for wood panels. This leads to warping, gapping, and buckling as the wood responds to room conditions after installation. Always acclimate 48–72 hours minimum.
- Not checking the wall for flatness. Rigid panels won't conform to wavy walls. Gaps behind panels cause hollow spots that flex and eventually crack.
- Using the wrong adhesive. Solvent-based adhesives on foam panels, or low-tack adhesives on heavy MDF, both lead to installation failure. Match the adhesive to the panel material.
- Starting from a corner without checking plumb. Most corners in residential construction are not perfectly square or plumb. If your first panel goes up crooked, every subsequent panel will be progressively more off. Always establish a true vertical reference line using a level.
- Ignoring outlet depth requirements. Adding panels adds wall depth. Electrical boxes may need extender rings to bring outlets and switches flush with the new panel surface. Buried, recessed outlets are a code violation in most jurisdictions.
- Neglecting to seal panel edges in humid areas. Unfinished edges on wood or MDF panels wick moisture rapidly. Seal all edges with primer, paint, or edge banding before installation in any humid environment.
- Installing over actively failing drywall. Panels cannot fix structural problems. Soft, moldy, or crumbling drywall must be replaced — not covered up — before any decorative paneling goes over it.
How Thick Are Wall Panels, and Does Thickness Matter Over Drywall?
Panel thickness affects the overall feel of your installation, the installation method, and practical considerations like door and window trim. Here's a general range:
| Panel Type | Typical Thickness | Weight per Sq Ft | Trim Extension Needed |
|---|---|---|---|
| PVC / Vinyl Panels | 3–8 mm | 0.3–0.6 lbs | Usually not needed |
| 3D Foam Panels | 10–30 mm | 0.2–0.5 lbs | Sometimes needed |
| Wood Slat Panels | 15–21 mm | 1.5–3 lbs | Often needed |
| MDF Panels | 12–19 mm | 2–4 lbs | Usually needed |
| Shiplap / Planking | 19–25 mm | 2–5 lbs | Typically needed |
When thicker panels bring the wall surface noticeably forward, window and door casing trim may no longer extend far enough to cover the gap between the frame and the new wall surface. This can be addressed by adding thin strips of wood (called "jamb extensions") to the window or door frame before installing trim, or by using thicker trim that covers the gap.
Design Considerations: Getting the Look Right With Decorative Wall Panels
Installation mechanics aside, the design decisions you make before purchasing panels have a major impact on the finished result. Here are the key considerations:
Full Wall vs. Accent Wall
Covering all four walls of a room with decorative paneling creates a rich, immersive effect but can feel heavy in smaller rooms. A single accent wall — typically the wall behind a bed, sofa, TV, or fireplace — is the more common approach and allows the paneling's texture and pattern to stand out without overwhelming the space. In rooms under 150 square feet, accent wall paneling almost always reads better than full-room coverage.
Vertical vs. Horizontal Orientation
The direction in which planks, slats, or boards are oriented changes the visual proportions of the room. Vertical panel installation draws the eye upward, making ceilings feel higher — ideal for rooms with standard 8-foot ceilings. Horizontal installation creates a sense of width, making narrow rooms feel broader. Diagonal installation is bold and less common, but creates strong visual energy in contemporary spaces.
Color and Finish
Natural wood finishes remain consistently popular, but painted panels — particularly in deep greens, navy blues, charcoal, or warm blacks — have gained significant traction in interior design over the past several years. MDF and composite panels take paint exceptionally well and produce a clean, modern finish. For a more raw, organic look, unfinished or lightly oiled wood panels let natural grain and variation take center stage.
Partial Height vs. Full Height Installation
Wainscoting — paneling that covers only the lower portion of the wall, typically 36–48 inches from the floor — is a time-tested design choice that adds architectural detail without dramatically changing the character of the upper wall. This approach pairs well with a painted upper wall and a contrasting chair rail at the top of the panels. Full-height paneling from floor to ceiling creates a more dramatic, enveloping effect appropriate for formal rooms, libraries, or high-contrast contemporary interiors.
Cost Breakdown: What to Budget for a Wall Panel Installation Over Drywall
Budget varies significantly by panel type, room size, and whether you're hiring a contractor or doing it yourself. Here are realistic ranges based on typical residential projects in 2024–2025:
- PVC decorative wall panels: $1–$4 per square foot for materials. Total installed cost (DIY) typically $2–$6 per sq ft including adhesive and trim.
- Wood slat panels (engineered): $5–$15 per square foot for materials. Premium real-wood slat panels can reach $20–$35 per sq ft.
- MDF/HDF panels: $2–$6 per square foot for materials. Painted finishes add $1–$2 per sq ft if professionally sprayed.
- Shiplap (pre-finished): $3–$8 per square foot for materials; real wood pine shiplap typically $2–$5/sq ft unfinished.
- 3D textured panels: $3–$8 per square foot for polyurethane; plaster versions range higher.
- Professional installation labor: Add $3–$8 per square foot depending on panel complexity and your region.
A standard 12x12-foot accent wall (approximately 144 square feet) with mid-range wood slat panels installed DIY typically lands in the $900–$1,800 total range, including panels, adhesive, nails, trim, and tools if you don't already own them. The same project professionally installed could run $1,800–$3,500 depending on location and contractor rates.
Frequently Asked Questions
Do I need to remove the existing drywall before installing wall panels?
No — in most cases, existing drywall in good condition makes an ideal substrate for decorative wall panels. You only need to remove drywall if it is water-damaged, moldy, structurally compromised, or significantly uneven in ways that can't be corrected with joint compound.
Can I install wall panels over painted drywall?
Yes, painted drywall is fine. The key is that the paint must be well-adhered to the drywall surface. If paint is peeling, bubbling, or chalky, scrape the loose areas, sand smooth, and prime before installing panels. Glossy paint can reduce adhesive bond — lightly scuff-sanding a glossy painted surface before applying adhesive adhesive improves grip.
Will installing panels over drywall cause any fire code concerns?
In most residential applications, standard decorative wall panels do not raise fire code issues. However, commercial spaces and some jurisdictions have specific requirements regarding flame spread ratings for interior finish materials. If you're installing in a commercial building or rental property, check local building codes or consult a contractor. Class A or Class 1 flame-spread rated panels are available for installations where this matters.
How do I handle corners when installing wall panels?
Inside corners can be handled by butting panels tightly together (run one wall's panel into the corner first, then cut the adjacent panel to fit against it). Outside corners are best finished with matching corner trim or by mitering the panels at 45 degrees if your saw can make accurate cuts. Most panel manufacturers offer matching corner molding accessories that make this step easier.
Can decorative wall panels be removed later without destroying the drywall?
It depends on the mounting method. Mechanically fastened panels (nails or screws) can be removed and leave behind only small holes that are easily patched. Adhesive-mounted panels are much more difficult to remove — construction adhesive creates a semi-permanent bond, and removal often damages the drywall paper face. If future removability is important, use a mechanical fastening method or Z-clip system rather than adhesive.
How many square feet of panels should I order?
Measure the total square footage of the walls you're paneling, then subtract openings (doors, windows). Add 10–15% overage for cuts, waste, and pattern matching. For diagonal or herringbone installations, increase overage to 15–20% due to higher cut angles producing more waste material.


 ++86-18906857262 / ++86-13754347028
 No.49, Tunnan Industrial Zone, Daohui Street, Shangyu District, Shaoxing City, Zhejiang Province, China