
 English
 русский
 عربى
عربى
A set of design, research and development, production, sales, installation in one of the professional new decorative materials enterprises.
Content
- 1 The Short Answer: How to Make a Wall with Wood
- 2 Types of Wood Wall Panels: Knowing What You Are Installing
- 3 Tools and Materials You Will Need Before Starting
- 4 Wall Preparation: The Step Most People Skip
- 5 Step-by-Step Installation of Wood Veneer Wall Paneling
- 6 Handling Corners, Outlets, and Obstacles
- 7 Finishing Unfinished Wood Veneer Panels
- 8 Wood Panel Wall Design Patterns and Layout Options
- 9 Wood Species Comparison for Wall Paneling
- 10 Cost Breakdown: What to Budget for a Wood Wall Project
- 11 Common Mistakes and How to Avoid Them
- 12 Maintaining and Cleaning Wood Veneer Wall Paneling
- 13 Frequently Asked Questions
- 13.1 Can I install wood veneer wall paneling directly over existing wallpaper?
- 13.2 Is wood veneer wall paneling suitable for bathrooms?
- 13.3 What is the difference between wood veneer paneling and laminate paneling?
- 13.4 How many square feet of material should I order?
- 13.5 Can wood wall panels be painted?
- 13.6 How do I remove a panel if I need to access the wall behind it?
The Short Answer: How to Make a Wall with Wood
Making a wall with wood comes down to four steps: choose your panel type, prepare the wall surface, cut panels to size, and fix them securely using adhesive, nails, or a combination of both. The most popular approach for interior spaces today is wood veneer wall paneling — thin slices of real wood bonded to a stable backing — because it delivers the warmth and grain pattern of solid timber at a fraction of the weight, cost, and environmental impact.
That said, "how to make a wall with wood" covers a wide range of outcomes. A rustic shiplap feature wall in a farmhouse living room looks nothing like a floor-to-ceiling walnut veneer panel installation in a hotel lobby — yet both follow the same fundamental logic. This guide walks through every meaningful variable, from surface prep to finishing coats, so you can make decisions that suit your space, your budget, and your skill level.
Types of Wood Wall Panels: Knowing What You Are Installing
Before touching a single tool, you need to understand what kind of wood panel you are working with. The material determines the adhesive, the cutting method, the expansion gap required, and the finish you apply afterward.
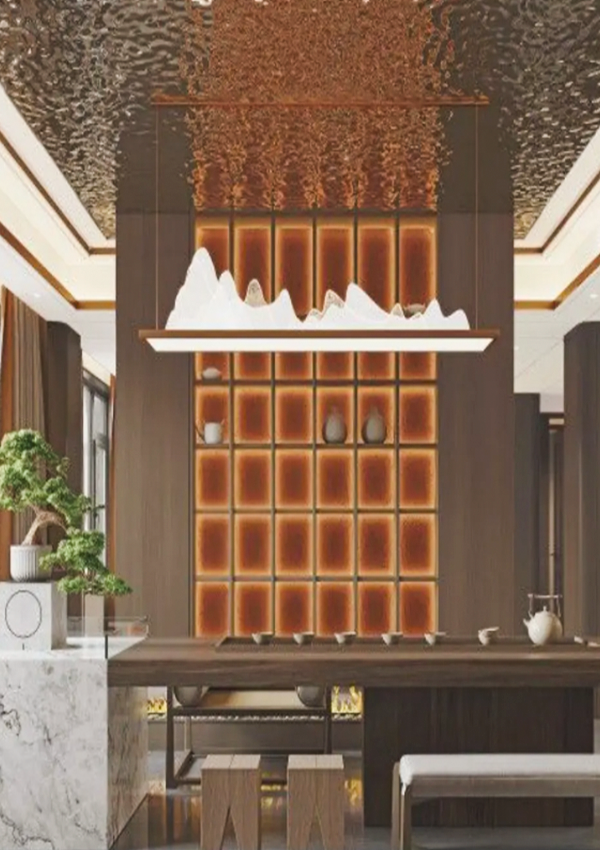
Wood Veneer Wall Paneling
Wood veneer wall paneling consists of a real wood face — typically 0.5 mm to 3 mm thick — bonded to a substrate such as MDF, plywood, or particleboard. The substrate provides dimensional stability while the veneer delivers the authentic grain, texture, and color variation of species like oak, walnut, ash, maple, and teak. Because the real wood layer is thin, a single tree yields dramatically more usable surface area than solid-sawn boards would. A standard 4 × 8 ft sheet of oak veneer paneling, for instance, uses roughly 95% less solid wood than an equivalent sheet of 3/4-inch solid oak.
Veneer panels come in two main constructions. Laid-up veneer joins multiple veneer leaves edge-to-edge across the panel face, allowing bookmatched or slip-matched grain patterns across large surfaces. Rotary-cut veneer peels a continuous sheet from a spinning log, producing a wide, flowing grain that covers an entire panel without seams. Rotary-cut is more economical; laid-up is preferred for high-end architectural work.
Related terms you will encounter when sourcing veneer wall panels include: real wood veneer panels, engineered wood wall panels, architectural veneer panels, and pre-finished veneer paneling. All refer to the same product family.
Solid Wood Planks and Boards
Shiplap, tongue-and-groove (T&G), and plain-edge boards are cut from solid timber. They are heavier, more prone to seasonal movement, and more expensive per square foot than veneer panels, but they offer genuine three-dimensional depth — visible in shadow lines where boards meet. Solid boards work well for exposed brick-style accent walls, barn-style cladding, and outdoor-adjacent applications where moisture tolerance matters.
Engineered Wood Panels (MDF, Plywood, OSB)
Plain MDF or plywood sheets are sometimes used as the base layer for painted wainscoting, batten-and-board designs, or as the substrate behind decorative veneer. They are the most dimensionally stable of all wood-based options but require a surface treatment — paint, veneer, or laminate — to look finished.
| Panel Type | Typical Thickness | Cost Range (per sq ft) | Best Use Case |
|---|---|---|---|
| Wood Veneer Wall Paneling | 6 mm – 19 mm | $4 – $25+ | Feature walls, offices, hospitality, retail |
| Solid Shiplap / T&G | 12 mm – 25 mm | $3 – $18 | Rustic interiors, mudrooms, covered exteriors |
| MDF / Plywood Base | 9 mm – 18 mm | $1 – $4 | Painted wainscoting, batten systems |
Tools and Materials You Will Need Before Starting
Assembling everything before you cut a single panel saves hours of frustration. The list below covers a standard interior wood veneer wall paneling installation on drywall. Adjust as needed for solid board projects or masonry walls.
Measuring and Marking Tools
- Tape measure (at least 25 ft)
- Digital or bubble level (48-inch minimum for vertical panels)
- Chalk line for snapping reference lines across the wall
- Stud finder — critical for nail or screw attachment
- Pencil and marking knife for precise cut lines
Cutting Tools
- Table saw or track saw for long rip cuts — essential for straight edges on large veneer sheets
- Miter saw for crosscuts and angled cuts at corners
- Jigsaw for cutouts around outlets and switches
- Router with flush-trim bit for trimming veneer precisely to edges
- Fine-tooth blade (80-tooth carbide for veneer) to prevent tearout on the face layer
Fastening and Adhesive Supplies
- Construction adhesive (solvent-free / low-VOC preferred for enclosed spaces)
- Finishing nailer with 1.5- to 2-inch 16-gauge nails
- Screw gun and 2-inch coarse drywall screws (for furring strips)
- Wood glue for edge joints
- Painter's tape and clamps to hold panels while adhesive sets
Finishing Supplies
- Wood filler or putty for nail holes
- 120- and 220-grit sandpaper or sanding block
- Stain, oil, or clear coat sealer matching your veneer species
- Trim pieces, corner moldings, and base/crown molding as needed
Wall Preparation: The Step Most People Skip
Poor wall prep is the number one reason wood wall panels look bad or fail prematurely. No matter how premium your wood veneer wall paneling is, it will telegraph every bump, hollow, and moisture problem underneath it. Budget at least 30% of your total project time for this phase.
Check for Moisture
Wood and moisture are incompatible long-term partners. Use a pin-type moisture meter on the existing wall surface. Drywall should read below 1% and concrete or masonry below 4% before you install any wood panels. On below-grade walls or exterior-facing interior walls, apply a vapor barrier — typically 6-mil polyethylene sheeting — before adding furring strips. Skipping this step on a basement wall can cause veneer delamination within 12 to 18 months.
Flatten the Surface
Lay a 6-foot straightedge horizontally and vertically across the wall. Any gap larger than 3/16 inch (roughly 5 mm) will show as a visible bow or dip in your finished panels. Fix high spots by sanding or grinding. Fill low spots with joint compound and let it cure fully — at least 24 hours at 70°F (21°C) before sanding smooth.
On severely uneven walls, masonry walls, or concrete, skip the skim-coat approach entirely and install horizontal furring strips (1×3 or 1×4 lumber) at 16-inch vertical intervals. Shim low spots behind the furring strips before fastening. This creates a perfectly flat nailing surface and leaves an air gap that helps manage moisture and adds minor thermal buffering.
Mark Stud Locations
In wood-framed walls, studs sit at 16-inch or 24-inch centers. Mark every stud location on the floor and ceiling with painter's tape so the marks remain visible after panels cover the lower wall. If you plan to hang heavy items — shelves, artwork, TVs — mark those stud locations prominently; you will need them for secure fastening after the panels are up.
Acclimate the Wood Panels
This applies to every wood-based panel product, including wood veneer wall paneling. Stack panels flat in the room where they will be installed for a minimum of 48 hours — 72 hours in rooms with wide humidity swings or near exterior walls. The panels need to reach equilibrium with the room's temperature and humidity before installation. Installing cold or dry panels into a warm humid room will cause expansion, buckling, and joint gaps within weeks.
Step-by-Step Installation of Wood Veneer Wall Paneling
The following process applies to sheet-format wood veneer wall paneling installed on a prepared drywall surface. Modifications for plank-style or solid board products are noted where relevant.
- Establish a plumb reference line. Use your level to draw a perfectly vertical line where your first panel edge will sit. Starting slightly off-plumb compounds errors across every subsequent panel. If the room corner is not plumb — and in most houses it is not — start your first panel one panel-width away from the corner, work toward the opposite corner, then cut and fit the corner pieces last.
- Dry-fit before committing. Hold each panel in position without adhesive. Check alignment, grain direction, and any cutouts needed for outlets or switches. Mark these positions clearly on the back of the panel using a template made from cardboard or paper.
- Cut precisely. Always cut veneer panels face-side up on a table saw (the blade exits through the back, so the face stays clean). On a circular saw, cut face-side down. Use a fine-tooth blade and support the panel on both sides of the cut to prevent tearout.
- Apply adhesive in vertical beads. Using a caulking gun, apply construction adhesive in vertical beads 12 inches apart on the back of the panel — not directly on the wall. Keep adhesive at least 1 inch away from panel edges to prevent squeeze-out at joints.
- Press and tack. Press the panel firmly against the wall, then pull it away for 60 to 90 seconds (check adhesive instructions for open time). This technique, called "conditioning," allows solvents to flash off and dramatically improves bonding strength. Press the panel back and tap firmly with a rubber mallet or block of wood to ensure full contact.
- Nail or screw through studs. Drive finishing nails or trim-head screws through the panel into studs at 12-inch vertical intervals. On pre-finished veneer panels, set nails below the surface and fill with color-matched putty. On unfinished panels, fill holes before applying finish.
- Maintain expansion gaps. Leave a 1/16-inch gap between panels and a 1/4-inch gap at floor level. Cover floor gaps with base molding. Between panel edges, use a thin spacer (a coin works) to keep gaps consistent — visible v-grooves or reveals are a common design detail that also accommodate movement.
- Work toward the corners. Fit corner pieces last, scribing them to the actual wall angle if the corner deviates from 90 degrees. Inside corners can be coped or butted; outside corners look best with a 45-degree miter on both panels or a decorative corner molding.
- Install trim and molding. Base molding, chair rail, crown molding, and panel trim strips complete the look and hide any gaps at edges. Nail trim through the panel into the wall framing — not just into the panel face — for a secure hold.
Handling Corners, Outlets, and Obstacles
Inside Corners
The simplest approach is to butt one panel flat into the corner and overlap the adjacent panel onto its edge. This avoids the need for a perfect miter and allows for slight wall irregularities. Alternatively, install a square wood corner piece first and then butt both panels into it.
Outside Corners
Outside corners get damaged easily and need protection. Options include a 45-degree miter (requires precise cutting and typically a shooting board), a wood corner bead, or a metal or rubber edge trim profile. For high-traffic areas like hallways, a metal corner bead is the most durable solution. On premium wood veneer wall paneling installations, a solid wood edge strip in a matching species creates a polished, furniture-grade look.
Electrical Outlets and Switches
Electrical boxes need to be flush with or slightly proud of the finished wall surface. After installing panels, the box face will be recessed by the panel thickness — typically 6 to 19 mm — which violates most electrical codes. Before installing, use outlet box extenders to bring the box face to the new finished surface level. Alternatively, reposition the boxes before paneling. After cutting the panel opening with a jigsaw, fit an oversize outlet cover plate to hide any minor gaps around the cut edge.
Finishing Unfinished Wood Veneer Panels
Many wood veneer wall paneling products are sold raw — sanded but unfinished — to allow contractors and designers maximum flexibility over the final look. Finishing the surface properly protects the veneer, enhances grain depth, and determines how well the wall resists humidity, scuffs, and cleaning.
Oil Finishes
Hardwax oil or Danish oil penetrates into the wood fibers rather than sitting on top as a film. The result is a low-sheen, natural look that is easy to repair — damaged areas can be spot-treated without refinishing the entire wall. Apply with a lint-free cloth, working along the grain. Wipe off excess within 30 minutes. Most oil finishes require two coats with a light 220-grit sand between coats. Cure time before washing or heavy use: approximately 7 days at 70°F (21°C).
Waterborne Polyurethane or Lacquer
Film-building finishes like waterborne polyurethane create a more protective, slightly harder surface. They are a better choice for kitchens, bathrooms, or any area with regular contact and cleaning. Apply with a foam roller or spray gun in thin coats — thick coats bubble and drip. Three coats with 220-grit sanding between each is standard for a smooth, durable result. Sheen options run from matte (around 10% gloss) to satin (25–35%) to semi-gloss (50–60%).
Staining Before Finishing
If you want to shift the color of your veneer — for example, making lighter ash look more like walnut, or adding warmth to maple — apply a penetrating stain before any clear topcoat. Test the stain on an offcut panel from the same batch, not just on a hardware store sample strip. Veneer absorbs stain differently from solid wood, and the result varies between species and even between different sheets of the same species. Let stain dry fully (typically 8 to 24 hours) before applying any topcoat.
Wood Panel Wall Design Patterns and Layout Options
The pattern in which you install your panels changes the visual weight and character of a room dramatically. Here are the most effective layout approaches for both veneer panels and solid wood boards.
Vertical Installation
Running panels or planks vertically draws the eye upward and makes ceilings appear taller. This is the most common orientation for wood veneer wall paneling in formal spaces, offices, and hospitality settings. The grain of most veneer species runs along the panel's long axis, so vertical installation also shows grain in its most natural orientation.
Horizontal Installation
Horizontal plank walls (shiplap is the most recognizable example) feel relaxed and casual. They work well in living rooms, bedrooms, and bathrooms. Because horizontal planks meet corners at natural 90-degree angles, corner treatment is simpler than with vertical panels. Horizontal installation also makes a narrow room feel wider.
Herringbone and Chevron
Diagonal patterns cut from narrower planks or strips create visual energy and complexity. Herringbone (each plank alternates direction at a 45-degree angle) and chevron (planks meet at a point in the center) are labor-intensive but deliver a premium, handcrafted result. Material waste runs 15–25% higher than straight patterns because of the angled cuts.
Wainscoting and Partial Height Panels
Covering only the lower portion of a wall — typically 36 to 48 inches high — and painting or leaving the upper portion plain is called wainscoting. It adds architectural detail without the cost of full-height coverage and protects the lower wall from chair backs and foot traffic. A chair rail molding caps the panel top and defines the transition. For a more contemporary look, full-height panels with a horizontal reveal or groove at chair-rail height create the same visual break without switching materials.
Bookmatched Veneer Panels
Bookmatching opens two sequential veneer leaves like the pages of a book, creating a symmetrical mirror image of the grain pattern across adjacent panels. The effect is spectacular on figured wood species like walnut burl, quartersawn oak, or figured maple. Bookmatched wood veneer wall paneling must be installed in the correct sequence and orientation — always mark the panel backs with arrows and numbers before handling to avoid accidentally reversing the sequence.
Wood Species Comparison for Wall Paneling
Species selection is a major aesthetic and budgetary decision. The following table summarizes the most widely used veneer and solid wood species for wall applications, covering visual character, hardness, and relative cost.
| Species | Grain Character | Janka Hardness | Cost Tier | Typical Use |
|---|---|---|---|---|
| White Oak | Open, prominent rays, warm tan | 1360 lbf | Mid-high | Residential, commercial |
| Black Walnut | Straight to wavy, rich chocolate | 1010 lbf | High | Luxury residential, hospitality |
| Ash | Straight, bold grain, pale cream | 1320 lbf | Mid | Modern interiors, retail |
| Maple | Fine, tight, creamy white | 1450 lbf | Mid | Contemporary, minimalist |
| Teak | Interlocked grain, golden-brown | 1155 lbf | High | Bathrooms, spa, high-end |
| Pine (solid) | Knotty, rustic, pale yellow | 870 lbf | Low | Farmhouse, casual interiors |
Cost Breakdown: What to Budget for a Wood Wall Project
Costs vary enormously depending on species, panel quality, room size, and whether you hire a professional installer or do the work yourself. The estimates below are based on a 150-square-foot accent wall (roughly 10 × 15 ft) in a standard residential interior in the United States as of 2024–2025.
Materials
- Budget veneer panels (e.g., birch or lauan on MDF): $4–$7 per sq ft → $600–$1,050 for 150 sq ft
- Mid-range wood veneer wall paneling (e.g., white oak on plywood): $8–$15 per sq ft → $1,200–$2,250
- Premium veneer panels (e.g., walnut bookmatched): $18–$30+ per sq ft → $2,700–$4,500+
- Pine shiplap (solid): $3–$6 per sq ft → $450–$900
- Adhesive, nails, trim, finish: add 20–30% to panel cost
Labor
Professional carpentry installation runs $35–$85 per hour depending on region. A straightforward 150-square-foot veneer panel wall takes an experienced carpenter 6–10 hours including prep — expect a labor cost of $210–$850. Complex pattern work, many cutouts, or challenging surfaces can push that to 16+ hours.
DIY labor saves the hourly cost but not the learning curve. First-time installers typically need 1.5–2× the time an experienced carpenter would take, and mistakes in cutting veneer panels are expensive to undo.
Common Mistakes and How to Avoid Them
These are the recurring problems that show up on wood wall projects, including professional installations.
- Not acclimating the panels: Results in bowing, joint gaps, or delamination. Always give panels 48–72 hours in the installation room before cutting.
- Using the wrong blade: A coarse blade tears out the veneer face, leaving a ragged edge. Use an 80-tooth fine-tooth carbide blade and score the cut line with a knife first.
- Skipping expansion gaps: Wood moves with humidity changes. Panels installed tight against each other or into corners will buckle or crack. Even pre-finished, dimensionally stable veneer panels need a 1/16-inch gap between sheets.
- Inconsistent panel reveals: The gap between adjacent panels needs to be uniform. Use a consistent spacer — a coin, a business card, or a purpose-made panel gap tool — and check every joint before the adhesive sets.
- Ignoring grain direction: On a large wall, panels with inconsistent grain direction create a patchy, disjointed look. Lay all panels out on the floor in installation order before cutting to confirm grain runs the same way.
- Applying too much adhesive near edges: Squeeze-out at joints is nearly impossible to remove from raw veneer without staining it. Keep adhesive beads at least 1 inch back from all panel edges.
- Finishing after installation without masking adjacent surfaces: Stain and oil spread easily. Mask baseboards, ceilings, and any adjacent surfaces before applying any finish to an installed panel wall.
Maintaining and Cleaning Wood Veneer Wall Paneling
Properly finished wood veneer wall paneling is easier to maintain than most people expect. The main threats are excess moisture, harsh cleaning chemicals, and direct impact.
- Routine dusting: Use a soft microfiber cloth or a dusting brush. Avoid feather dusters, which can scratch. Dust with the grain direction.
- Light cleaning: A cloth barely dampened with water and a drop of mild dish soap handles most marks. Wring the cloth out thoroughly — never let standing water sit on the veneer surface.
- Avoid: Bleach-based cleaners, ammonia, steam cleaners, and abrasive pads. These strip finish and raise the grain of the veneer face.
- Humidity control: Maintain indoor relative humidity between 35% and 55% year-round. Below 35%, veneer can shrink and joints open. Above 60% sustained, swelling and delamination risks rise significantly.
- Refinishing: Oil-finished panels can be refreshed every 2–3 years with a fresh coat of the same oil, applied and wiped off as before. Polyurethane-finished surfaces may need full sanding and recoating every 8–15 years depending on traffic and exposure.
Frequently Asked Questions
Can I install wood veneer wall paneling directly over existing wallpaper?
It is strongly discouraged. Wallpaper is not a stable bonding surface, and moisture trapped between the wallpaper and panel can cause both the wallpaper adhesive and the panel adhesive to fail. Strip the wallpaper, repair any wall damage, and let the surface dry fully before paneling.
Is wood veneer wall paneling suitable for bathrooms?
Yes, with the right species, substrate, and finish. Use a marine-grade or moisture-resistant MDF substrate, a naturally oily species like teak or iroko, and seal all six faces of each panel (front, back, and four edges) with a waterborne polyurethane or specific bathroom-rated coating before installation. Ensure strong ventilation or an exhaust fan keeps humidity from spiking above 60% RH during and after showering.
What is the difference between wood veneer paneling and laminate paneling?
Veneer paneling has a real wood face — an actual slice of timber — bonded to a substrate. Laminate paneling has a photographic image of wood printed onto a paper or resin layer, which is then bonded to a substrate. Veneer can be sanded, stained, and refinished; laminate cannot. Veneer feels and smells like real wood; laminate does not. Laminate is typically cheaper and more consistent in color but lacks the tactile character and repairability of genuine veneer.
How many square feet of material should I order?
Measure the total wall area in square feet, subtract windows and doors, then add a waste factor. For straight horizontal or vertical installations, add 10–15% for cuts and defects. For diagonal patterns like herringbone or chevron, add 20–25%. For bookmatched veneer where sequence matters, consult your supplier — ordering matched panels requires specific yardage calculations beyond simple area.
Can wood wall panels be painted?
Yes. Painting over wood veneer paneling is a legitimate design choice, particularly for MDF-substrate panels in wainscoting or batten-and-board applications. Prime first with a shellac-based primer or high-adhesion primer to block tannins (which cause staining through paint on many species). Apply two coats of quality latex or oil-based wall paint. Note that once you paint a real wood veneer, you cannot easily reverse it to a natural wood finish.
How do I remove a panel if I need to access the wall behind it?
If panels were installed with nails only, a flat pry bar and patience will remove most panels intact. If construction adhesive was used, removing panels without damage to the panel, the drywall behind, or both is extremely difficult. For walls where future access may be needed — mechanical chases, inspection panels — plan a removable section from the start, mounting those specific panels with screws driven through pre-drilled holes from the face and covered with matching plugs or trim strips.


 ++86-18906857262 / ++86-13754347028
 No.49, Tunnan Industrial Zone, Daohui Street, Shangyu District, Shaoxing City, Zhejiang Province, China