
 English
 русский
 عربى
عربى
A set of design, research and development, production, sales, installation in one of the professional new decorative materials enterprises.
Content
- 1 The Short Answer: How to Install Wood Paneling on Walls
- 2 Understanding Your Wood Paneling Options Before You Buy
- 3 Tools and Materials You'll Need to Install Wood Paneling
- 4 Preparing the Wall Surface: The Step Most People Skip
- 5 How to Measure, Plan Your Layout, and Cut Panels
- 6 Step-by-Step: Installing Wood Paneling on the Wall
- 7 Special Considerations for Wood Veneer Wall Paneling
- 8 Installing Wood Paneling on Concrete or Masonry Walls
- 9 Common Mistakes and How to Avoid Them
- 10 How Long Does It Take and What Does It Cost?
- 11 Caring for Wood Paneled Walls After Installation
The Short Answer: How to Install Wood Paneling on Walls
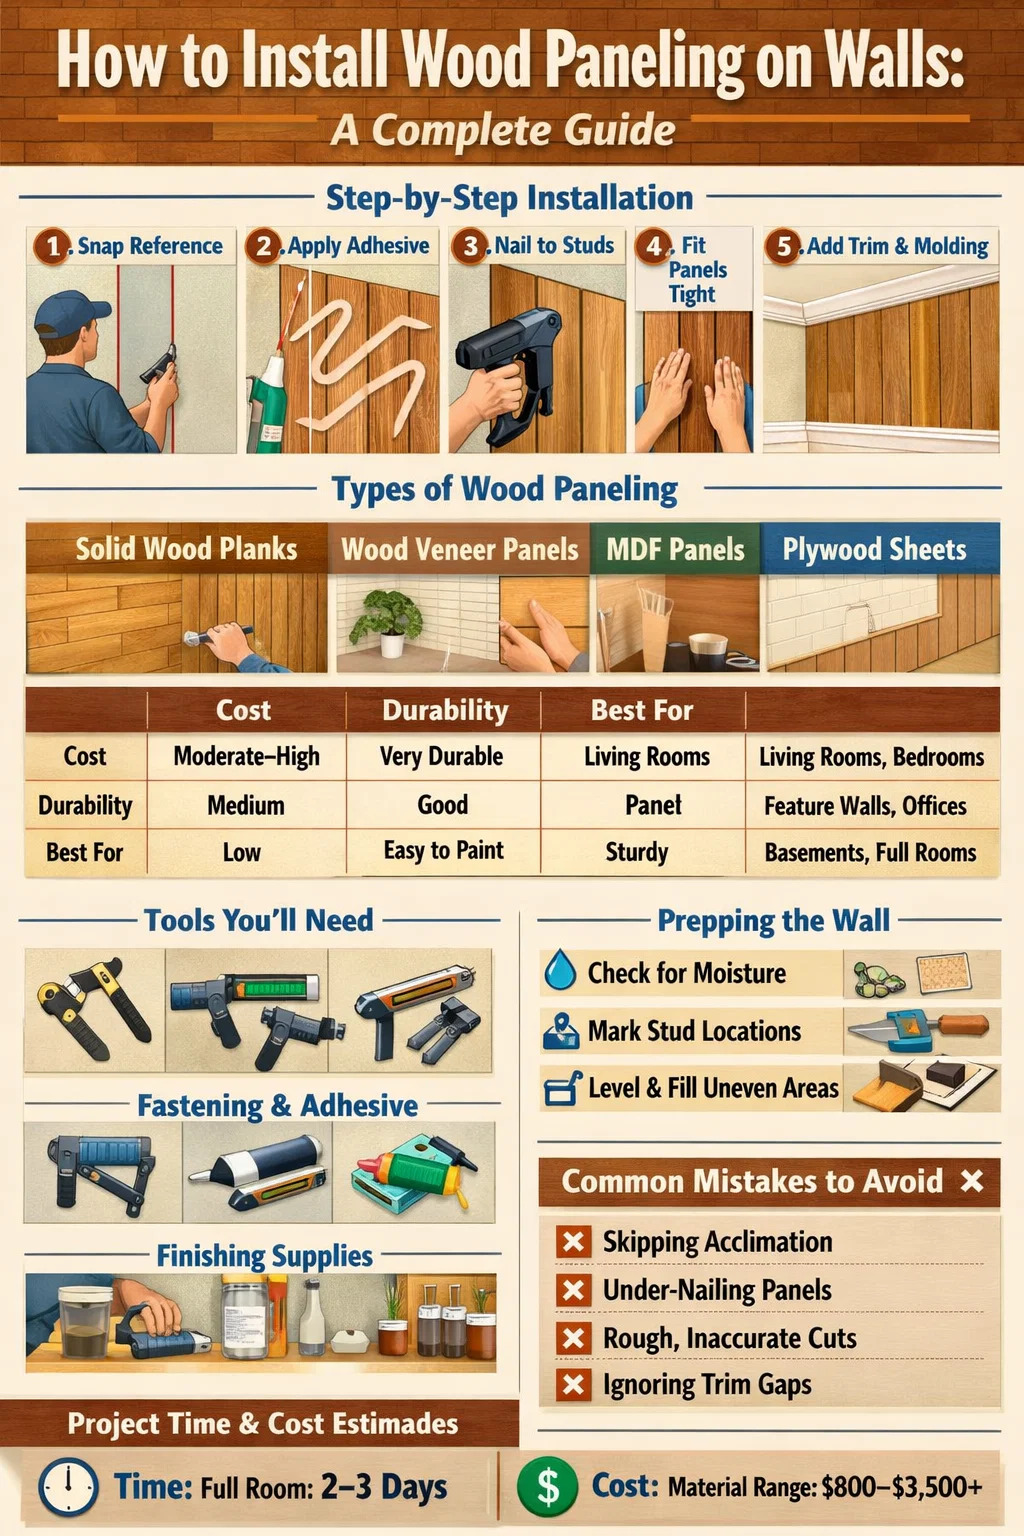
Installing wood paneling on walls comes down to five core steps: prepare the wall surface, measure and cut your panels, apply adhesive or fasten with nails, fit panels tightly together, and finish the edges with trim. Whether you're working with solid wood planks, shiplap, or wood veneer wall paneling, the fundamental process stays the same — though the material you choose will affect your tools, adhesive type, and finishing approach. Most DIYers with basic carpentry skills can complete a standard 12×12 ft room in a single weekend.
The sections below break down each stage in full detail, covering everything from wall prep and stud location to corner cuts, adhesive selection, and how to handle tricky spots like outlets and windows. If you've never worked with wall paneling before, this guide is designed to get you through the entire project without expensive mistakes.
Understanding Your Wood Paneling Options Before You Buy
Before you buy a single panel, you need to understand what's actually available on the market — because the type of paneling you choose will completely change your installation method, your budget, and the final look of the room. Not all wood paneling is the same, and picking the wrong product for your space is one of the most common and costly mistakes homeowners make.
Solid Wood Planks
Solid wood planks — often pine, cedar, or oak — are exactly what they sound like: full-thickness pieces of wood, typically ½ inch to ¾ inch thick. They're durable, can be sanded and refinished multiple times, and offer a genuine warmth that manufactured alternatives can't replicate. The trade-off is cost and weight. Solid pine shiplap runs approximately $2.50–$5.00 per square foot, while hardwood options like white oak can reach $10–$18 per square foot before installation.
Wood Veneer Wall Paneling
Wood veneer wall paneling uses a thin slice of real hardwood — typically between 0.6 mm and 3 mm thick — bonded to a substrate such as MDF (medium-density fiberboard), plywood, or particleboard. This construction gives you the authentic grain pattern and visual depth of solid wood at a significantly lower price point. Premium veneer wall paneling made with walnut, cherry, or teak face veneers can cost $4–$9 per square foot, compared to $20+ for solid equivalents. Because the core is engineered, veneer panels are also more dimensionally stable — they expand and contract less with humidity changes, which matters enormously in rooms like kitchens or bathrooms.
MDF and Composite Panels
Primed MDF panels are the most budget-friendly choice, typically running $1.00–$2.50 per square foot. They're uniform, easy to paint, and lightweight. However, they're vulnerable to moisture — never use raw MDF in bathrooms or basements without a vapor barrier and proper sealing. Composite panels sit between MDF and veneer: they may have a wood-look printed film rather than a real wood face, which affects how they age over time.
Plywood Panels
Standard 4×8 ft plywood sheets with a finish-grade face veneer are a classic choice for wall paneling. They install quickly, hold fasteners extremely well, and Baltic birch plywood in particular offers a clean, contemporary aesthetic when left with a clear finish. Expect to pay $45–$120 per sheet depending on species and grade.
| Paneling Type | Avg. Cost (per sq ft) | Real Wood Face | Moisture Resistance | Best For |
|---|---|---|---|---|
| Solid Wood Planks | $2.50–$18.00 | Yes | Moderate | Living rooms, bedrooms |
| Wood Veneer Wall Paneling | $4.00–$9.00 | Yes (thin layer) | Good (sealed) | Feature walls, offices |
| MDF Panels | $1.00–$2.50 | No | Poor | Painted accent walls |
| Plywood Sheets | $1.40–$3.75 | Veneer face | Good | Whole-room coverage |
Tools and Materials You'll Need to Install Wood Paneling
Having the right tools on hand before you start is non-negotiable. Running back to the hardware store mid-project breaks your momentum, wastes time, and often leads to misaligned panels or dried-out adhesive. Here's a complete list organized by category.
Measuring and Layout Tools
- Tape measure (25 ft minimum)
- 4-ft or 6-ft level
- Chalk line
- Stud finder (electronic is preferable over magnetic)
- Pencil and marking square
Cutting Tools
- Miter saw (also called a chop saw) — essential for clean angle cuts on trim
- Circular saw or table saw for ripping panels to width
- Jigsaw for outlet cutouts and irregular shapes
- Fine-tooth blade (80-tooth or higher for veneer panels to prevent chipping)
- Utility knife and straight edge for scoring thin veneer sheets
Fastening and Adhesive Tools
- Finish nail gun (15- or 16-gauge) or brad nailer (18-gauge for thinner panels)
- Construction adhesive such as Liquid Nails or Loctite PL Premium
- Caulk gun
- Rubber mallet for tapping panels into position without denting the face
- Drill and bits for pre-drilling near edges to prevent splitting
Finishing Supplies
- Wood filler or putty for nail holes
- 120-grit and 220-grit sandpaper
- Stain, paint, or clear sealer depending on your chosen finish
- Paintbrush, roller, and paint tray
- Painter's tape
- Caulk in a color matching your panels or trim
Preparing the Wall Surface: The Step Most People Skip
Wall preparation is where most DIY wood paneling projects either succeed or fail. Panels installed over an uneven, damp, or structurally compromised wall will buckle, pop off, or look wavy within months. Spending an extra half-day on wall prep is almost always worth it.
Check for Moisture and Mold
Before doing anything else, inspect the wall for signs of moisture intrusion or mold. Press a piece of plastic sheeting (about 16×16 inches) against the wall with tape and leave it for 24 hours. If you see condensation on the back side, you have a moisture problem that must be addressed before installing any wood product. Installing wood veneer wall paneling or any wood product over a damp wall will destroy it within 12–18 months through warping, delamination, and mold growth.
Locate and Mark All Studs
Use your stud finder to locate every stud in the wall and mark them clearly with a pencil at both the top and bottom of the wall. In standard North American construction, studs are spaced either 16 inches or 24 inches on center. Mark each stud location at the floor and ceiling with a light pencil line — you'll extend these lines across the wall later using your chalk line. These marks tell you exactly where to nail your panels for a secure hold. Nails that miss studs and only catch drywall will eventually pull out, especially for heavier panels.
Flatten Any High Spots and Fill Low Areas
Run a long straightedge (4 ft or longer) across the wall in multiple directions to identify high and low spots. Any deviation greater than ⅛ inch over 4 feet will be visible once flat panels are installed. Sand or scrape down high spots, and fill low areas with joint compound. Allow compound to dry fully — typically 24 hours for thin coats — then sand smooth and prime. For very uneven masonry walls, the most practical solution is to install a framework of 1×3 or 1×4 furring strips first, shimming them level before attaching your panels.
Acclimate Your Paneling
This step is critical and widely ignored. Wood and wood-based panels must be acclimated to the room's temperature and humidity for at least 48 hours before installation — 72 hours is even better for solid wood. Stand panels vertically with spacers between them so air can circulate around all surfaces. This allows the material to expand or contract to its equilibrium moisture content in your specific environment. Skipping acclimation is a leading cause of post-installation gapping, buckling, and joint cracking.
How to Measure, Plan Your Layout, and Cut Panels
Accurate measuring and a thoughtful layout plan prevents wasted material and awkward-looking seams. Professional installers typically do a full dry layout — positioning every panel without adhesive or nails first — before committing to anything permanent.
Calculate How Much Paneling You Need
Measure the total square footage of your walls by multiplying height × width for each wall section, then add all sections together. Subtract the square footage of any windows, doors, or other openings that won't be covered. Add 10% to your total for waste and cuts — bump this to 15% if your layout involves diagonal patterns or if you're working with figured wood veneer panels where grain matching matters. Buying too little and needing to reorder later can result in mismatched dye lots or grain patterns, particularly with wood veneer wall paneling.
Plan Your Starting Point
The most visually prominent wall — usually the one you see directly when entering a room — should be planned so that any cut panels fall in less obvious locations like corners. Find the center of your feature wall, snap a vertical chalk line there, and work outward in both directions. This approach ensures that any narrow cut strips at each corner are roughly equal in width, avoiding the amateur look of a full panel on one side and a 2-inch sliver on the other.
Cutting Panels Without Chipping
The face side of the panel is the side that shows, and it's prone to chipping if you cut incorrectly. The rule is simple: when using a circular saw, cut with the face side down (the blade enters from the back), because the blade's teeth cut upward and any tearout happens on the back. When using a table saw or miter saw, cut with the face side up. Score veneer panels with a sharp utility knife along your cut line before sawing — this severs the grain and prevents tearout at the edge. Always use a fine-tooth blade, minimum 60 teeth for a 7¼-inch blade, and 80-tooth for very thin veneer panels.
Cutting Outlet and Switch Openings
To transfer the exact location of electrical boxes to your panel, apply a light coat of lipstick or colored chalk to the box rim, position the panel against the wall in its exact final location, and press firmly. The box will leave a mark on the back of the panel. Drill a small starter hole at one corner of the mark, then cut out the opening with a jigsaw. Always turn off power to the circuit at the breaker before working near electrical boxes.
Step-by-Step: Installing Wood Paneling on the Wall
With your walls prepped, panels acclimated, and layout planned, you're ready for the actual installation. Follow these steps in order for the cleanest result.
Step 1 – Snap Vertical Reference Lines
Using your chalk line, snap a perfectly plumb vertical line at your starting position (the center of the wall, or your chosen starting corner). Verify this line is truly vertical with your level — even walls that look straight are often slightly out of plumb. All subsequent panels reference back to this first line, so getting it right is worth taking your time.
Step 2 – Apply Construction Adhesive
Apply construction adhesive to the back of the panel in a serpentine (S-shaped) pattern, keeping the beads about 3 inches from the edges to prevent squeeze-out. For panels being glued directly to drywall, also apply a bead of adhesive along each stud line. Press the panel firmly to the wall, pull it back about 6 inches, hold it for about 60 seconds to allow the adhesive to become tacky, then press it back into final position. This "flash-off" technique creates a dramatically stronger bond than pressing once and leaving it.
Step 3 – Nail the Panel into Studs
Even when using adhesive, always nail panels into studs for mechanical security. Use a finish nail gun loaded with 2-inch finish nails (for ¾-inch panels) or 1½-inch nails (for ½-inch panels). Nail along the stud lines you marked earlier, spacing nails every 16 inches vertically. Keep nails at least ¾ inch from the panel edges to prevent splitting. Set the nail head slightly below the surface so it can be filled later. For wood veneer wall paneling specifically, a brad nailer with 18-gauge nails is often preferable — the smaller nail head is easier to conceal in the delicate veneer face.
Step 4 – Install Subsequent Panels
Work across the wall one panel at a time. Butt each panel tightly against the previous one — for tongue-and-groove products, engage the joint fully before nailing. For flat-edge panels like plywood sheets, leave a 1/16-inch expansion gap between panels to accommodate seasonal movement. This gap is typically hidden by a thin batten strip or covered with caulk. Check each panel for plumb before nailing it off. Don't assume the previous panel sets the reference; walls accumulate small errors quickly, and an out-of-plumb panel will throw everything that follows.
Step 5 – Handle Corners Carefully
Inside corners are rarely perfectly square. Use a compass or scribing tool to trace the wall's actual profile onto the edge of your panel, then cut along that line for a tight fit. Outside corners can be handled several ways: a 45-degree mitered joint looks the most refined but requires precise cuts; a corner trim molding is easier and more forgiving; or you can wrap the panel around the corner if the material is thin enough. For outside corners on veneer paneling, consider iron-on edge banding to protect the exposed substrate from damage.
Step 6 – Install Baseboards, Chair Rail, and Crown Molding
Once all panels are fastened, install your trim. Baseboards cover the bottom gap between the panel and floor, chair rail (if used) caps the top edge of wainscoting, and crown molding finishes the ceiling junction. Miter inside corners at 45 degrees and cope outside corners for a tighter, more professional fit. Nail trim into studs with 2½-inch finish nails, set the heads, and fill before painting. Trim transforms a good-looking paneling job into a truly finished, built-in appearance.
Special Considerations for Wood Veneer Wall Paneling
Wood veneer wall paneling requires a few extra considerations that don't apply to solid wood or MDF products. The veneer face — that thin real-wood layer — is both the panel's best feature and its most vulnerable part.
Grain Matching for a Seamless Look
Premium veneer paneling products are often sold in sequenced sets — panels cut from the same flitch (log section) in order, so the grain flows continuously from one panel to the next. When ordering these products, always request sequential panels and number them before installation so you can lay them in the correct order. Installing them out of sequence breaks the visual flow and creates an obvious patchy appearance.
Protecting the Veneer Surface During Installation
Never drag veneer panels across each other or across rough surfaces — even minor scratches on the face veneer are difficult to repair cleanly. Carry panels vertically with a helper rather than dragging them. Use a scrap piece of wood as a tapping block when fitting tongue-and-groove joints; never hit the panel face or edge directly with a hammer. Keep all adhesives, solvents, and water away from the veneer face during installation.
Finishing Veneer Panels After Installation
If your veneer panels arrive unfinished, apply finish after installation rather than before — this allows you to blend the seams more seamlessly. Lightly sand the entire wall with 220-grit sandpaper, vacuum up all dust, and wipe down with a tack cloth. Apply your chosen finish — penetrating oil, hardwax oil, polyurethane, or lacquer — in thin coats, allowing each to dry fully before the next. Two to three coats is standard for wall applications; floors typically require more. A penetrating oil like Rubio Monocoat or Osmo Polyx-Oil is popular for wood veneer wall paneling because it enhances the natural grain without the plastic look of film-forming finishes.
Installing Wood Paneling on Concrete or Masonry Walls
Basements and older homes frequently have concrete block or poured concrete walls. Direct-adhering panels to masonry is possible but comes with significant risks — primarily moisture migration through the concrete. The safer, more durable approach is to build a framework first.
Install a Furring Strip Framework
Attach 1×3 or 1×4 pressure-treated furring strips horizontally to the masonry wall using concrete screws (such as Tapcon screws) every 16 inches. Space the furring strips 16 inches apart vertically — this gives you a nailing surface that aligns with standard panel dimensions. If the masonry wall has bumps or low spots, shim behind the furring strips to bring them into a flat, coplanar plane. Check each strip with your level before fastening permanently.
Install a Vapor Barrier
Between the masonry and the furring strips, staple or tape 6-mil polyethylene sheeting to act as a vapor barrier. This prevents ground moisture and concrete condensation from reaching your wood panels. In climates with significant temperature differentials between inside and outside, consider consulting a building professional about proper vapor control placement — getting this wrong can cause more moisture problems than it solves.
Attach Panels to the Furring Framework
Once the framework is in place, the installation process is identical to nailing into wall studs. Nail or staple panels into the furring strips, check each panel for plumb, and proceed across the wall as described in the main installation steps above. This method adds roughly 1½ inches of depth to the wall, which matters in narrow spaces — factor this into your planning before committing to this approach.
Common Mistakes and How to Avoid Them
Even experienced woodworkers make errors when installing wall paneling for the first time. These are the mistakes that show up most often — and how to sidestep each one.
- Not acclimating the panels: Panels installed at a different moisture content than the room will gap, buckle, or crack within months. Always allow 48–72 hours of acclimation time.
- Starting from a corner: Walls look crooked from corners. Always start from a plumb vertical reference line at the wall's center or at a visually dominant starting point.
- Using too few fasteners: Relying on adhesive alone or under-nailing leads to panels that pop away from the wall over time. Nail into every stud on every panel.
- Ignoring the floor's flatness: If your floor isn't level, your first course of horizontal planks will drift out of level across the wall. Use a level line on the wall instead of following the floor.
- Skimping on blade quality: A dull or coarse blade will chip, tear, and splinter your panels — especially critical for wood veneer wall paneling where the face is thin and irreplaceable.
- Forgetting to account for trim thickness: If you're installing baseboard and crown molding, panels don't need to reach all the way to the floor or ceiling. Mark trim height before cutting to save material.
- Buying panels from different lots: Even panels of the same species and brand can vary in color and grain between production lots. Buy all your paneling at once from the same batch.
How Long Does It Take and What Does It Cost?
Realistic time and cost expectations prevent the frustration of a project that balloons beyond your initial plan. Here's how to think about both.
Time Estimates by Project Size
A single accent wall in a bedroom or living room — roughly 80–120 square feet — typically takes an experienced DIYer 6–8 hours including prep, cutting, and nailing. Add another 2–3 hours for trim installation. A full room (all four walls of a 12×14 ft space, approximately 400–500 square feet excluding openings) is realistically a full weekend project: one day for prep and layout, one day for installation and trim. If you're working alone, add 20–30% to these estimates — having a second person to hold panels while you nail makes an enormous difference.
Material Cost Breakdown for a Typical Room
For a 12×14 ft room with 8-ft ceilings (roughly 320 square feet of wall space after subtracting doors and windows), here's a realistic material cost range:
- MDF panels: $350–$900
- Solid pine shiplap: $900–$1,800
- Wood veneer wall paneling (mid-range): $1,400–$3,200
- Premium hardwood solid: $3,500–$6,000+
- Trim and molding (all walls): $200–$600
- Adhesive and fasteners: $60–$120
- Finish (stain, oil, or polyurethane): $80–$200
Professional installation labor typically adds $3–$7 per square foot on top of material costs, depending on panel type, complexity of the layout, and your regional market. For a full room with mid-range veneer panels, expect a professional total of $2,500–$5,000 or more in most US cities.
Caring for Wood Paneled Walls After Installation
Once your paneling is installed and finished, proper care will keep it looking excellent for decades. Wood walls are actually quite low-maintenance compared to painted drywall, but a few specific practices make a difference.
- Dust regularly: Use a soft microfiber cloth or the brush attachment on a vacuum. Avoid feather dusters that just redistribute dust into crevices between boards.
- Clean spills quickly: Wood — even sealed veneer — can absorb liquids if left to sit. Blot immediately with a dry cloth, then follow with a slightly damp cloth if needed.
- Avoid steam cleaners and excess water: Steam and standing water can cause veneer delamination and raise the grain on solid wood panels.
- Maintain stable indoor humidity: Keep indoor relative humidity between 35% and 55% year-round to minimize seasonal wood movement. A whole-house humidifier in winter and proper AC in summer helps enormously in climates with large seasonal swings.
- Refresh the finish periodically: Oil-finished panels should receive a fresh coat of maintenance oil every 1–3 years. Polyurethane-finished panels may need a light sand and recoat every 5–10 years depending on wear and UV exposure from sunlight.
- Touch up scratches promptly: A furniture touch-up marker in a matching color, followed by a dab of clear finish, can make minor scratches nearly invisible on most wood and veneer panels.


 ++86-18906857262 / ++86-13754347028
 No.49, Tunnan Industrial Zone, Daohui Street, Shangyu District, Shaoxing City, Zhejiang Province, China