
 English
 русский
 عربى
عربى
A set of design, research and development, production, sales, installation in one of the professional new decorative materials enterprises.
Content
- 1 The Short Answer: How to Hang Wall Panels
- 2 Types of Decorative Wall Panels and Why It Matters for Installation
- 3 Tools and Materials You Need Before You Start
- 4 Wall Preparation: The Step Most People Skip
- 5 Planning Your Panel Layout Before You Cut Anything
- 6 How to Hang Wall Panels with Adhesive
- 7 How to Hang Wall Panels with Nails or Screws
- 8 Cutting Panels to Fit Around Obstacles
- 9 Finishing Decorative Wall Panels for a Professional Result
- 10 Installing Decorative Wall Panels in Bathrooms and Wet Areas
- 11 Common Mistakes When Hanging Wall Panels and How to Avoid Them
- 12 Design Ideas and Layouts for Decorative Wall Panels
The Short Answer: How to Hang Wall Panels
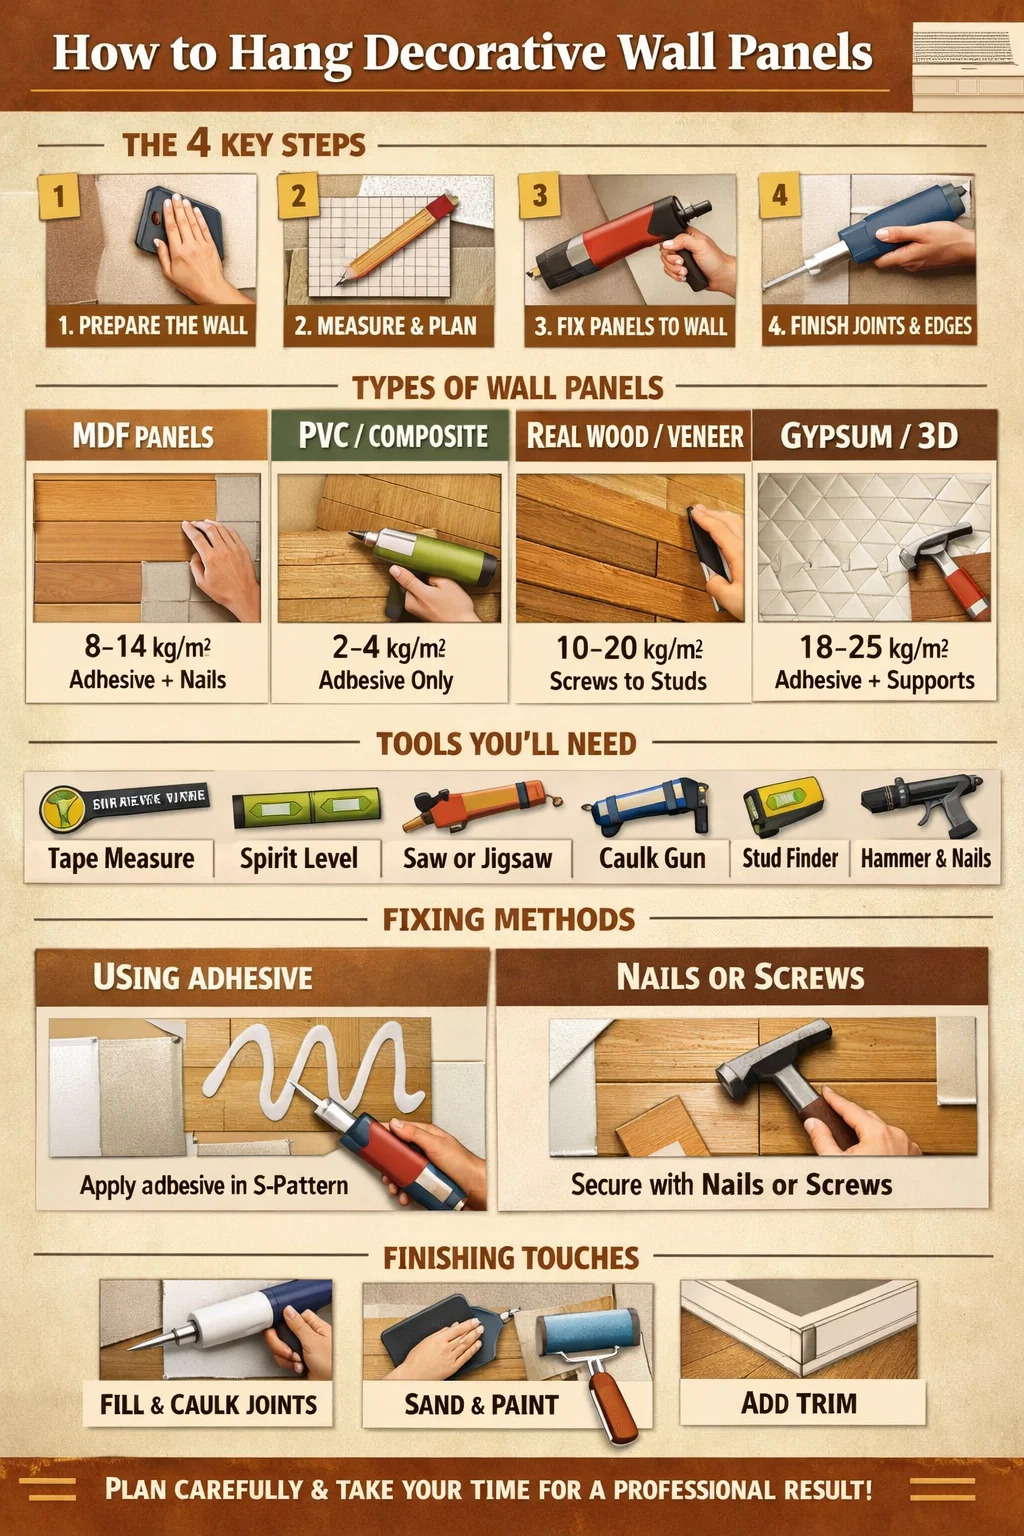
Hanging decorative wall panels comes down to four core steps: prepare the wall surface, measure and plan your layout, apply the chosen fixing method (adhesive, nails, or a combination), and finish the joints and edges. Most standard PVC, MDF, or wood decorative wall panels can be installed by a single person in a weekend with basic tools. Get those four steps right, and you will end up with a result that looks professionally done and lasts for years.
The sections below walk through everything in detail — from choosing the right panel type for your room to fixing common installation mistakes after the fact.
Types of Decorative Wall Panels and Why It Matters for Installation
Not all decorative wall panels hang the same way. The material determines the weight, the fixing method, the tools you need, and how forgiving the panel is when you make a small error. Before buying anything, know exactly what you are working with.
MDF Wall Panels
Medium-density fibreboard panels are among the most popular for interior accent walls. They typically weigh between 8 and 14 kg per square metre depending on thickness (most common sizes are 9mm, 12mm, and 18mm). MDF requires wall plugs or panel adhesive combined with finish nails. It can be painted in any colour and takes a clean, crisp edge, making it ideal for grid panels, shaker-style panelling, and geometric feature walls.
PVC and Composite Panels
PVC decorative wall panels are lightweight — often under 3 kg per square metre — and moisture-resistant, making them the go-to for bathrooms, kitchens, and utility rooms. They can usually be fixed with a compatible solvent-free adhesive alone, without any mechanical fixings. Some systems use a tongue-and-groove click profile that locks panels together and slides onto a starter strip screwed to the wall.
Real Wood and Veneer Panels
Solid wood and wood veneer panels are heavier and more sensitive to humidity. They need mechanical fixings — typically screws into wall studs or a timber batten framework — and should be left to acclimatise in the room for at least 48 hours before installation to prevent warping after hanging.
3D Textured and Gypsum Panels
Gypsum and plaster 3D decorative wall panels are heavy — sometimes over 20 kg per square metre — and brittle. They must be fixed to a solid, flat surface with construction adhesive applied generously in an S-pattern and held in place with temporary supports while the adhesive cures. Drilling into them causes cracking.
| Panel Type | Typical Weight (per m²) | Recommended Fixing Method | Best Use |
|---|---|---|---|
| MDF | 8–14 kg | Adhesive + finish nails | Living rooms, bedrooms |
| PVC / Composite | 2–4 kg | Adhesive only or click system | Bathrooms, kitchens |
| Real Wood / Veneer | 10–20 kg | Screws into studs / battens | Feature walls, studies |
| Gypsum / 3D Plaster | 18–25 kg | Construction adhesive + supports | Accent walls, lobbies |
Tools and Materials You Need Before You Start
Running to the hardware store halfway through an install is one of the most common reasons DIY panel projects go wrong. Panels shift, adhesive skins over, and your layout marks fade. Have everything ready before the first panel comes out of the box.
Measuring and Layout Tools
- Tape measure (at least 5 metres)
- Spirit level or laser level — a laser level saves significant time on large walls
- Pencil for marking (not pen — ink bleeds through paint)
- Stud finder (essential for wood and heavy panels)
- Square or combination square for corner checks
Cutting Tools
- For MDF and wood panels: circular saw or mitre saw with a fine-tooth blade (at least 40 teeth for a clean edge)
- For PVC panels: fine-tooth hand saw or a jigsaw with a fine blade; score-and-snap also works on thinner PVC
- For gypsum panels: a fine-tooth handsaw only — power tools vibrate and crack the material
Fixing Materials
- Panel adhesive (grab adhesive rated for the substrate — e.g., Stixall, No More Nails Heavy Duty, or a foam panel adhesive)
- Caulking gun for applying adhesive evenly
- Finish nails or panel pins (typically 40mm to 50mm for MDF)
- Nail gun or hammer
- Wood screws and wall plugs if going into masonry
- Masking tape and temporary support blocks or spacers
Finishing Materials
- Flexible decorators' caulk or panel joining trim for seams
- Wood filler or fine surface filler for nail holes
- Sandpaper (120-grit and 240-grit)
- Primer and paint (for MDF and wood panels)
Wall Preparation: The Step Most People Skip
Poor wall preparation is the single biggest cause of decorative wall panel failure — panels pop off, adhesive bonds fail, or the finished surface looks uneven. A panel can only be as flat and secure as the surface behind it.
Check for Flatness
Hold a long spirit level or a straight length of timber against the wall and check for gaps. Any hollow or bump greater than 3mm over a 2-metre span needs to be addressed before you start. Fill dips with bonding compound or skim plaster. Sand down high spots or pack them out with batten if the variation is large.
Clean and Degrease the Surface
Dust, grease, and loose paint dramatically reduce adhesive strength. Wash the wall with a sugar soap solution, rinse it, and let it dry completely — this usually takes 2 to 4 hours in a well-ventilated room. In kitchens, a degreaser may be necessary. If the existing paint is flaking, strip it back to a stable surface before proceeding.
Prime New Plaster or Bare Masonry
New plaster is highly porous and will absorb moisture from adhesive before the bond can form. Apply a diluted PVA primer (1 part PVA to 4 parts water) or a dedicated bonding primer and allow it to dry fully. This step is non-negotiable on fresh plaster or bare blockwork.
Locate and Mark Your Studs
For any panel requiring mechanical fixings, run a stud finder across the wall and mark every stud location with a pencil at the top and bottom. In UK homes, studs are typically spaced at 400mm or 600mm centres. In older properties, spacing can be irregular, so check every stud individually rather than assuming a pattern.
Planning Your Panel Layout Before You Cut Anything
A good layout plan prevents awkward slivers of panel at the edges, ensures the pattern is balanced, and reveals how many full panels versus cut panels you will need. Do this on paper — or on a simple sketch — before touching the wall.
Measure the Wall Accurately
Measure the wall width and height at multiple points. Walls are rarely perfectly square — measure both the top and bottom widths and both side heights. Use the smallest measurement as your working dimension. If the difference between top and bottom is more than 10mm over a standard 3-metre wall, you will need to scribe your edge panels to fit.
Work from the Centre Outward
For feature walls with a repeating pattern — such as 3D geometric panels or shiplap — always start from the centre of the wall and work outward. This creates symmetry so that any cut pieces at each edge are equal in width. Starting from one corner and working across almost always results in a noticeably narrow cut strip on the opposite corner.
Calculate Your Panel Count with Waste Allowance
Divide the wall area by the coverage area of a single panel, then add a 10% waste allowance for standard rectangular panels and 15% for diagonal or complex pattern layouts. For example: a 4m × 2.4m wall (9.6m²) using panels with 0.375m² coverage requires approximately 25 to 27 panels. Order at the same time from the same batch to avoid colour variation between production runs.
Mark a True Horizontal Reference Line
Use a laser level or spirit level to mark a perfectly horizontal chalk line across the wall at the height of your first panel row. Do not use the floor or skirting board as your reference — floors are almost never level. Even a 2mm slope per metre translates to a 6mm cumulative error across a 3-metre wall, which becomes very visible by the time you reach the ceiling.
How to Hang Wall Panels with Adhesive
Adhesive-only fixing is the cleanest method for lightweight decorative wall panels — no visible nail holes, no mechanical fixings breaking through the face. It works well on smooth, flat surfaces for panels up to approximately 10 kg per square metre. For heavier panels, combine with mechanical fixings as described in the next section.
- Dry-fit the panel first. Hold it in position and check the fit. Mark the wall lightly around the edges with a pencil. This gives you a guide when pressing the panel into place after adhesive is applied.
- Apply adhesive in a zigzag or S-pattern to the back of the panel, keeping the beads approximately 150mm to 200mm apart. Keep adhesive away from the very edges to prevent squeeze-out.
- For porous surfaces, apply adhesive to the wall too (double-bonding). This significantly increases bond strength on plaster and plasterboard.
- Press the panel firmly into position for the time specified on the adhesive packaging — typically 30 to 60 seconds. Apply even pressure across the whole face.
- Pull the panel away slightly (5 to 10mm) for 5 minutes if using a solvent-based grab adhesive. This allows the solvents to flash off and significantly increases the initial grab strength before you press it back permanently. Check your specific adhesive instructions — not all types require this step.
- Use masking tape, timber spacers, or temporary support battens to hold the panel in position while the adhesive fully cures. Most panel adhesives reach handling strength within 30 minutes to 2 hours but reach full bond strength after 24 to 48 hours.
- Repeat for each panel, maintaining consistent gap spacing using tile spacers or off-cuts of the panel material as spacers.
How to Hang Wall Panels with Nails or Screws
Mechanical fixing is more secure for heavier panels and on walls where adhesive bonding cannot be guaranteed — for example, over old gloss paint, textured wallpaper, or slightly damp walls. For MDF wall panelling specifically, a combination of adhesive and nails is the industry standard approach.
Nailing MDF Panels Directly to the Wall
Apply panel adhesive to the back of the MDF panel as described above, press it into position, and then drive 50mm panel pins or finish nails through the face at regular intervals — typically every 300 to 400mm along the edges and through the centre. Use a nail punch to sink the nail heads 1 to 2mm below the surface, then fill the holes with fine wood filler, sand flush when dry, and paint over.
Installing a Timber Batten Framework
A batten framework is the right approach for uneven walls, heavy solid-wood panels, or when you want a small air gap behind the panels for ventilation or wiring. Use 25mm × 50mm treated timber battens fixed horizontally at the top, bottom, and at roughly 400mm vertical intervals across the wall. Pack behind the battens with timber shims to bring them to a common flat plane, and check with a straight edge before fixing any panels.
Fix the battens to the wall with 65mm to 75mm screws into wall plugs for masonry, or 50mm screws directly into studs for timber-framed walls. Once the framework is flat and secure, panels can be screwed or nailed to the battens, with fixings hidden behind trim, in grooves, or through the face and filled.
Hidden Clip Systems
Many premium wood and composite decorative wall panel systems come with concealed clip or rail systems. A metal or plastic rail is screwed to the wall, and panels click or hook onto it from the back — leaving the panel face completely free of fixings. These systems are more expensive but produce a clean, seamless result and allow individual panels to be removed and replaced without damage.
Cutting Panels to Fit Around Obstacles
Most walls have at least one obstacle — a light switch, a socket, a window recess, a doorframe. Cutting panels accurately around these is what separates a professional-looking result from an amateur one.
Scribing to Irregular Surfaces
Where a panel meets an uneven surface — a textured ceiling, a rough brick chimney breast, or an out-of-plumb corner — use a scribe to transfer the profile. Hold the panel in its final position, run a compass or purpose-made scribing tool along the irregular surface with the pencil marking the panel, then cut along that line. A jigsaw with a fine blade is the best tool for curved or irregular scribe cuts.
Cutting Out Electrical Sockets and Switches
Hold the panel up to the wall with the socket position marked on it. Use a try square to transfer the exact position to the panel face. Drill a 10mm starter hole inside each corner of the cutout, then use a jigsaw to cut between the holes. The cutout should be slightly smaller than the face plate of the socket so the face plate covers the edge of the cut. Always isolate the electrical circuit before working near sockets.
Corner Joints: Internal and External
For internal corners, the standard method is to butt one panel tight into the corner, then overlap the adjacent panel on top of it. Fill the join with flexible caulk to accommodate any seasonal movement. For external corners, a 45-degree mitre cut on both panels creates a sharp, clean join. Alternatively, external corner trims (aluminium or PVC extrusions) cover the join and remove the need for a precise mitre.
Finishing Decorative Wall Panels for a Professional Result
Installation is only two-thirds of the job. Finishing — filling, sealing, painting, and trimming — is what makes a panel wall look deliberate and high-end rather than DIY.
Filling Nail Holes in MDF Panels
Use a fine surface filler or wood stopper. Apply with a small flexible spatula, slightly overfilling each hole. Sand flush with 120-grit once dry, then again with 240-grit for a smooth finish. Wipe off dust before priming. Do not skip the priming step on MDF — unpainted MDF grain-raises dramatically on the first coat of emulsion, creating a rough texture that shows through topcoats.
Sealing Panel Joints
For flush-butt panels designed to be painted as a single surface, apply flexible decorator's caulk to every joint. Run a bead of caulk along the joint, smooth it with a damp finger or caulk tool, and allow to skin over before painting. Rigid filler will crack at joints as the wall and panels expand and contract seasonally — always use a flexible product here.
Priming and Painting MDF Panels
Apply a dedicated MDF primer or a high-build solvent-based primer to all faces and exposed edges. Edges absorb more primer than faces, so apply two coats to edges specifically. Lightly sand with 240-grit between primer coats. Then apply two to three topcoats of your chosen paint, allowing full drying time between coats. For a hard-wearing finish in high-traffic areas, use a satin or semi-gloss water-based paint rated for woodwork.
Adding Finishing Trim
Quad bead or architrave trim along the top edge where panels meet the ceiling, and along the bottom edge above the skirting board, creates a clean termination line and hides any small gaps. Fix trim with adhesive and finish nails, fill and paint to match. For PVC panels in wet areas, use a dedicated colour-matched edge trim profile from the same manufacturer to ensure a watertight seal.
Installing Decorative Wall Panels in Bathrooms and Wet Areas
Bathroom wall panels are one of the fastest-growing alternatives to ceramic tiles, and for good reason — installation is faster, grout lines are eliminated, and maintenance is minimal. But wet-area installations have specific requirements that dry-room installs do not.
Use only moisture-resistant panels — PVC, solid acrylic, or specifically rated composite boards. Standard MDF will swell and fail in sustained humidity. The wall behind the panels must also be moisture-resistant: use cement board or moisture-resistant plasterboard (green board or blue board) rather than standard plasterboard, particularly in shower enclosures.
Apply a continuous bead of waterproof silicone sealant along all horizontal joints, corners, and where panels meet the bath, shower tray, or floor. Do not rely on adhesive alone to create a waterproof seal — the adhesive holds the panel; the silicone seals the joint. Use a mould-resistant silicone formulated for bathrooms.
Leave a minimum 5mm expansion gap at all edges — top, bottom, and sides — to allow for thermal movement of PVC panels. Cover these gaps with edge trim profiles. PVC can expand by up to 3mm per metre in temperature changes common in bathrooms, so ignoring expansion gaps causes panels to buckle at joints.
Common Mistakes When Hanging Wall Panels and How to Avoid Them
Not Acclimatising the Panels
Wood and MDF panels stored in a cold garage and brought directly into a heated room will absorb moisture from the air and expand. Leave panels flat in the room where they will be installed for a minimum of 24 hours (48 hours for solid wood). This prevents post-installation warping or joint gaps opening up within weeks of fitting.
Using the Wrong Adhesive
Solvent-based adhesives can attack and dissolve foam-backed panels and some PVC products. Always check the panel manufacturer's adhesive recommendations. When in doubt, use a water-based or foam panel adhesive. The wrong adhesive is not just a performance problem — it can chemically damage the panel and void any warranty.
Ignoring the Starting Point
Starting from a corner without checking if it is truly plumb means that every subsequent panel inherits the error. Always establish a true vertical reference line using a spirit level or laser level before fixing the first panel. A wall that is 5 degrees out of plumb in the corner will produce visibly skewed panels by the time you are halfway across the wall.
Rushing the Adhesive Cure Time
Removing supports and adding load to freshly adhered panels before the adhesive has cured causes panels to slip or detach. Refer to the adhesive data sheet for cure times and respect them. In cold or humid conditions, cure times can be 50% longer than stated in normal conditions — so a 24-hour cure becomes 36 hours in a cold room in winter.
Forgetting to Seal MDF Edges
MDF edges are far more absorbent than faces. Unsealed edges in humid environments absorb moisture, swell, and cause the panel to distort. Seal all cut edges with primer or an MDF edge sealer before installing panels in kitchens, utility rooms, or anywhere with elevated humidity.
Design Ideas and Layouts for Decorative Wall Panels
Understanding how to hang the panels is one thing — knowing how to arrange them for maximum visual impact is another. The same panel product can look completely different depending on the layout and room context.
Classic Grid Panelling
MDF strips arranged in a rectangular grid — also called picture frame panelling or shaker panelling — is one of the most versatile layouts. The grid can be adjusted to suit room proportions: taller rectangles make low ceilings feel higher; wider rectangles emphasise width. Typically done with 45mm to 70mm MDF strips fixed onto a flat painted wall, with the wall colour continued inside and outside the grid for a tonal effect.
Vertical Shiplap and Cladding
Horizontal shiplap is the classic, but vertical cladding draws the eye upward and adds apparent height to a room. It works particularly well in narrow hallways and rooms with low ceilings. Vertical boards are fixed from floor to ceiling and can be painted, stained, or left natural depending on the material.
Half-Height Dado Panelling
Panels running from skirting board to roughly 900mm to 1200mm off the floor, capped with a dado rail, is a traditional approach that adds depth and protects the wall from chair backs and everyday contact. It is particularly effective in dining rooms, hallways, and stairwells. The upper wall can be a contrasting or complementary colour to the panelled lower section.
Full-Wall 3D Textured Feature Panel
A single accent wall covered in 3D decorative wall panels — wave, diamond, brick, or geometric patterns — creates a focal point without requiring the whole room to be panelled. Most effective behind a bed headboard, behind a sofa, or behind a TV unit. Paint in a single colour to unify the texture, or leave natural for a raw material look.


 ++86-18906857262 / ++86-13754347028
 No.49, Tunnan Industrial Zone, Daohui Street, Shangyu District, Shaoxing City, Zhejiang Province, China