
 English
 русский
 عربى
عربى
A set of design, research and development, production, sales, installation in one of the professional new decorative materials enterprises.
Building wooden wall panels is a straightforward process when you break it into clear stages: plan your layout, prepare the wall surface, cut and finish your panels, then install them securely. Whether you're working with solid wood boards or Wood Veneer Wall Paneling, the core method stays the same — measure carefully, work clean, and fasten properly. Most DIYers with basic tools can complete a standard accent wall in a single weekend.
This guide covers every step in detail, from choosing the right wood species and panel thickness to finishing techniques that protect your work for decades. You'll also find specific measurements, tool lists, and cost estimates to help you plan before you buy a single board.
Content
- 1 Why Wooden Wall Panels Are Worth the Effort
- 2 Choosing the Right Type of Wood Panel for Your Project
- 3 Tools and Materials You'll Need Before You Start
- 4 Planning Your Layout: Measurements and Design Decisions
- 5 Preparing the Wall Surface for Panel Installation
- 6 Step-by-Step: How to Build Wooden Wall Panels
- 6.1 Step 1 — Establish Your Reference Lines
- 6.2 Step 2 — Cut Your First Panel or Board to Length
- 6.3 Step 3 — Apply Construction Adhesive
- 6.4 Step 4 — Nail or Screw the Panel to Studs
- 6.5 Step 5 — Continue Installing Panels Row by Row
- 6.6 Step 6 — Handle Corners and Edges
- 6.7 Step 7 — Cut Around Outlets and Switches
- 7 Installing Large-Format Wood Veneer Wall Paneling: Key Differences
- 8 Finishing Your Wood Panels: Staining, Painting, and Sealing
- 9 Common Mistakes and How to Avoid Them
- 10 Design Ideas for Different Room Types
- 11 How Long Does the Project Take and What Does It Cost?
- 12 Maintaining Wood Wall Panels Over Time
Why Wooden Wall Panels Are Worth the Effort
Wood paneling has moved well beyond the dark, dated look of 1970s interiors. Today's installations — particularly those using Wood Veneer Wall Paneling — deliver a warmth and texture that paint simply cannot replicate. Real wood adds acoustic dampening, slight thermal insulation, and a tactile quality that makes a room feel finished in a way drywall never does.
From a practical standpoint, wood panels are durable. A properly sealed oak or walnut panel can last 30 to 50 years with minimal maintenance. Compare that to wallpaper, which typically needs replacement every 7 to 10 years, or specialty paint finishes that fade and chip within 5 years in high-traffic areas.
Cost-wise, a DIY wooden accent wall using standard pine boards runs roughly $3 to $8 per square foot in materials. Upgrading to a wood veneer wall panel system pushes that to $10 to $25 per square foot, still far below contractor-installed stone or tile, which often exceeds $40 per square foot installed.
Choosing the Right Type of Wood Panel for Your Project
The term "wooden wall panel" covers a wide range of products. Your choice affects cost, installation difficulty, durability, and final appearance significantly. Here's a breakdown of the main categories:
Solid Wood Boards
These are milled directly from timber, typically in widths of 3 to 8 inches and thicknesses of ¾ inch. Pine, cedar, shiplap, and tongue-and-groove boards fall into this category. They're forgiving to cut and install, accept stain and paint easily, and feel genuinely substantial. The downside is movement — solid wood expands and contracts with humidity changes, so you need to leave small gaps between boards or use floating installation methods.
Wood Veneer Wall Paneling
Wood Veneer Wall Paneling consists of a thin slice of real hardwood — typically 0.5mm to 3mm thick — bonded to a stable substrate like MDF or plywood. This construction gives you the authentic look and grain of premium species like walnut, teak, white oak, or maple at a fraction of the cost of solid hardwood. Because the substrate is dimensionally stable, veneer panels resist warping and cracking far better than solid wood in environments with humidity fluctuations.
Veneer panels are particularly popular for modern, seamless wall designs because they can be manufactured in large panel sizes — 4 x 8 feet or even 4 x 10 feet — with matched grain patterns across multiple sheets. This creates a flowing, continuous wood grain effect across an entire wall that's impossible to achieve with individual solid boards.
Engineered Wood Panels (MDF and Plywood)
Plain MDF or plywood panels are used as a base for painted geometric designs, like slat walls, grid patterns, or batten-and-board trim work. They're the most affordable option — standard ¼-inch MDF runs about $25 to $35 per 4x8 sheet — and they're stable, easy to paint, and widely available. However, they have no natural wood character and require paint or a veneer face to look finished.
Reclaimed and Barnwood Panels
Salvaged wood from old barns, factories, or demolished buildings brings unique character — weathering, nail holes, color variation — that new lumber can't replicate. It's genuinely sustainable when sourced responsibly. The challenge is inconsistency in thickness and width, which demands more careful fitting and fastening. Expect to pay $8 to $20 per square foot for quality reclaimed panels.
| Panel Type | Avg. Cost/Sq Ft | DIY Difficulty | Stability | Best Use Case |
|---|---|---|---|---|
| Solid Pine/Cedar Boards | $3–$8 | Easy | Medium | Rustic, farmhouse styles |
| Wood Veneer Wall Paneling | $10–$25 | Moderate | High | Modern, seamless accent walls |
| MDF / Plywood Panels | $1–$3 | Easy | High | Painted geometric designs |
| Reclaimed / Barnwood | $8–$20 | Hard | Low–Medium | Character-rich, industrial spaces |
Tools and Materials You'll Need Before You Start
Having the right tools ready before you begin saves trips to the hardware store mid-project and prevents rushed decisions. Here's a complete list organized by category:
Measuring and Layout Tools
- Tape measure (at least 25 feet)
- Laser level or traditional level (4-foot minimum)
- Chalk line for marking long horizontal and vertical guides
- Stud finder — essential for locating framing behind drywall
- Pencil, marking knife, and square
Cutting Tools
- Miter saw (compound miter saw preferred for angled cuts)
- Circular saw with a fine-tooth blade (for ripping panels to width)
- Jigsaw for cutouts around outlets and switches
- Router with a straight bit (optional, for clean edge profiles)
Fastening Tools and Hardware
- Nail gun (brad nailer 18-gauge or finish nailer 15/16-gauge)
- Compressor or cordless nail gun
- Construction adhesive (liquid nails or PL Premium)
- Caulk gun
- Drill/driver with bits
- Wood screws (1-5/8" and 2-1/2" lengths cover most needs)
Finishing Supplies
- Sandpaper in 80, 120, and 220 grit
- Wood filler or putty for nail holes
- Paintable caulk for gaps and seams
- Primer, stain, or finish of your choice
- Brushes, rollers, or spray equipment
Planning Your Layout: Measurements and Design Decisions
Poor planning is the number-one cause of frustrating installations. Spend time here, and the actual building goes smoothly.
Measure the Wall Accurately
Measure the wall's total width and height at multiple points. Walls are rarely perfectly square — a floor-to-ceiling height can vary by ½ inch or more from corner to center. Record the shortest and longest measurements. For a wall that's 12 feet wide and 9 feet tall, you're working with 108 square feet. Always add 10% to 15% extra material for cuts, waste, and damaged pieces. So order for at least 120 square feet in this example.
Choose Your Panel Orientation and Pattern
Horizontal boards make a room feel wider. Vertical boards draw the eye upward and make ceilings feel taller. Diagonal or herringbone patterns create dynamic visual interest but require more precise cutting and generate more waste — budget an extra 20% material for these patterns. A grid or batten-and-board design is popular for contemporary spaces and works especially well with wood veneer wall panel sheets as the flat background.
Plan Panel Seams Strategically
When using large-format veneer panels, plan seam locations to fall at the least visible spots — typically away from direct sight lines when entering the room. For board installations, stagger end joints so no two adjacent rows end at the same point. A minimum stagger of 24 inches between end joints in neighboring rows is the professional standard.
Account for Electrical Outlets, Switches, and Trim
Mark every outlet, switch, HVAC vent, and window/door casing on your layout drawing. These require cutouts or mitered returns. Outlet boxes may need extension rings if your panels add more than ¼ inch of thickness to the wall surface — this is a code requirement in most jurisdictions. Purchase outlet extenders (about $3 to $6 each) before you start if your panels are thick.

Preparing the Wall Surface for Panel Installation
The wall behind your panels matters more than most people realize. Skipping preparation leads to panels that bow, pop off, or look uneven within months.
Inspect and Repair the Existing Wall
Check the drywall for moisture damage, soft spots, or active leaks. Never install wood panels over a water-damaged wall — the moisture will transfer into your panels and cause warping, mold, and adhesive failure. Repair any drywall damage, let patches cure fully (at least 24 hours), and address any moisture source before proceeding.
If the existing wall has thick, glossy paint, lightly sand it with 80-grit paper or score it with a utility knife in a cross-hatch pattern. This gives construction adhesive a surface to bond to. Smooth, glossy surfaces cause adhesive failure.
Find and Mark the Studs
Use a stud finder and mark every stud with a pencil or tape at the top and bottom of the wall. Standard framing places studs 16 inches on center, but older homes sometimes use 24-inch spacing. Stud fastening is critical — nails or screws driven into drywall alone won't hold heavy panels over time. Mark a vertical chalk line at each stud so you can see fastening locations even after panels go up.
Install Furring Strips if Needed
If the wall is uneven (bowing more than ⅛ inch over 8 feet, measurable with a straight edge), install horizontal furring strips — 1x3 or 1x4 boards screwed to studs — to create a flat, level mounting surface. Space furring strips 16 inches apart vertically. This adds ¾ inch of thickness to the wall but ensures your panels lie flat. It also creates a small air gap that helps manage moisture, which is especially beneficial in basements.
Acclimate Your Wood Panels
This step is non-negotiable. Store your panels flat in the room where they'll be installed for at least 48 to 72 hours before installation. Wood adjusts its moisture content to match the ambient humidity, which causes slight expansion or contraction. If you skip this and install panels straight from a cold delivery truck into a warm, humid room, you'll see gaps form as panels shrink, or buckling as they expand. For solid wood boards, a full week of acclimation is even better.
Step-by-Step: How to Build Wooden Wall Panels
With preparation done, here's the complete installation sequence. This process applies to board-style installations; specific notes for large-format wood veneer wall paneling are included where the method differs.
Step 1 — Establish Your Reference Lines
Use a laser level to draw a perfectly level horizontal line at your starting height — typically at the floor or at a specific height if you're doing a wainscoting installation. Also snap a plumb vertical line at one end of the wall. These two reference lines are your foundation. Every subsequent board aligns to them, so if they're off, every panel will be off.
For floor-to-ceiling installations, start at the floor and work up. If your floor isn't level (common in older homes), begin with the first board slightly above the floor and fill the gap later with base trim. Trying to follow an unlevel floor causes every subsequent board to drift out of level.
Step 2 — Cut Your First Panel or Board to Length
Measure the wall width for your first piece. If the wall is 144 inches wide and your boards are 6 inches wide, you might cut a full-length board for the first piece. Cut it cleanly with a miter saw. For veneer panel sheets, use a circular saw with a fine-tooth blade (60 to 80 teeth for clean cuts in veneer) and a straightedge guide to ensure perfectly straight cuts. Cut with the finished face down when using a circular saw to minimize tear-out on the visible surface.
Step 3 — Apply Construction Adhesive
Apply construction adhesive in a serpentine pattern along the back of the panel or board. Use roughly one tube per 32 square feet of coverage. For boards under 4 inches wide, run a single bead down the center. For wider boards or panels, run a zig-zag pattern keeping adhesive 1 inch from edges to prevent squeeze-out on the finished face. Press the panel firmly against the wall and slide it slightly side-to-side to spread the adhesive before positioning it precisely.
Step 4 — Nail or Screw the Panel to Studs
With the board or panel held against the wall, drive nails or screws into wall studs. For ¾-inch boards, use 2-inch brad nails or 1-5/8-inch finish nails. For ¼-inch veneer panels over furring strips, 1-inch brad nails work well. Drive fasteners every 16 inches vertically along each stud. Use a nail set to sink nail heads slightly below the surface so they can be filled later.
For hidden fastening — a cleaner look with no visible nail holes — use a finish nailer at a 45-degree angle through the tongue of tongue-and-groove boards. This is called blind nailing and completely conceals fasteners. It requires a nail gun; doing it by hand is impractical.
Step 5 — Continue Installing Panels Row by Row
Work along the wall in one direction, checking for level every 3 to 4 boards. Small level errors compound quickly — if each board is 1/16-inch out of level, by the time you've installed 16 boards across a 12-foot wall, you're nearly an inch off. Correct drift immediately by shimming slightly. For horizontal board installations, leave a 1/16-inch gap between boards to allow for wood movement, especially if you didn't acclimate the wood or if the room sees seasonal humidity swings.
Step 6 — Handle Corners and Edges
Inside corners can be handled by butting boards directly against each other. Outside corners require a 45-degree miter cut on each board so they meet cleanly at the corner's edge. This is where a compound miter saw earns its keep — set it to 45 degrees and cut both pieces to meet at the corner point. Apply wood glue to mitered corner joints in addition to construction adhesive for a strong bond. Use a corner clamp to hold pieces aligned while the glue sets (typically 30 to 60 minutes before it's safe to release).
Alternatively, install corner molding or trim strips over butt-jointed corners. This is faster and easier than mitering, and it covers any small gaps from imperfect cuts.
Step 7 — Cut Around Outlets and Switches
Measure the outlet or switch box location precisely from the floor and from the nearest installed panel edge. Transfer those measurements to your next panel and use a jigsaw or oscillating multi-tool to cut the opening. Cut it 1/8 inch larger on all sides than the actual box dimensions — this small gap will be hidden by the outlet cover plate. If your panel thickness pushes the box face more than ¼ inch back from the wall surface, install an outlet extender before hanging the cover plate.

Installing Large-Format Wood Veneer Wall Paneling: Key Differences
Wood Veneer Wall Paneling in large-sheet format (4x8 or 4x10 feet) requires some techniques that differ from individual board installation.
Get a Helper — Large Panels Are Heavy
A 4x8 sheet of ¾-inch veneer MDF weighs approximately 80 to 95 pounds. You cannot safely hold it in position and fasten it simultaneously by yourself. A second person is essential, or use panel jacks (rented tool, roughly $30 to $50/day) that mechanically hold panels in place while you fasten.
Match Grain Direction Across Panels
One of the biggest advantages of wood veneer wall paneling is the ability to book-match or run-match grain patterns across multiple sheets for a seamless appearance. When purchasing, ask for consecutively cut panels from the same flitch (sequence of veneer slices). Install them in the same sequence they were cut, maintaining consistent grain direction. Flipping or rotating a sheet breaks the pattern and creates a jarring visual break.
Use Panel Clips or Adhesive-Only Installation
For a truly seamless veneer wall with no visible fasteners, some veneer panel systems use concealed clips that lock into routed grooves on panel edges. The panels snap together and fasten without any surface penetrations. This is a premium approach used in high-end residential and commercial interior design. Alternatively, a full-coverage adhesive application — spreading adhesive across the entire back surface with a notched trowel — can provide enough holding force without nails, but only on a perfectly flat wall surface.
Handle Veneer Panels Carefully to Avoid Edge Damage
The veneer face is delicate, especially at edges and corners. Carry panels vertically, not flat (flat carrying causes them to flex and crack). Use felt pads or carpet scraps to protect surfaces when resting panels on the floor. Never drag panels across concrete or rough surfaces — even a brief contact can scratch the veneer face in ways that are difficult to repair once the panel is installed and finished.
Finishing Your Wood Panels: Staining, Painting, and Sealing
The finish determines how the panels look for years to come. Take your time here — rushing the finish is the most common mistake in DIY paneling projects.
Fill Nail Holes and Sand Seams
Use a wood filler that matches your intended finish. For stained wood, choose a stainable wood filler in a color close to the wood species (natural pine filler for pine, dark walnut filler for walnut). Press it firmly into each nail hole, let it dry completely (typically 30 minutes to 1 hour), then sand flush with 120-grit sandpaper. Follow with 220-grit for a smooth surface that takes stain or paint evenly.
For seams between panels that weren't perfectly tight, apply paintable caulk, smooth with a damp finger, and let it cure. On painted installations, caulked seams disappear. On stained installations, visible seams must be minimized through tight joints during installation — caulk doesn't accept stain evenly.
Staining for a Natural Wood Look
If you're preserving the natural wood appearance — which is the main reason to choose real wood veneer wall paneling — apply a pre-conditioner first on softer woods like pine or birch. Pre-conditioner prevents blotchy absorption that makes stain look uneven. Apply it with a brush or cloth, wait 15 minutes, then apply stain while the conditioner is still wet.
Wipe stain on with a cloth, working with the grain, and wipe excess off before it dries. Let it dry 24 hours, then apply a protective topcoat. For walls, a water-based polyurethane in a satin or matte sheen is durable and easy to apply. Apply two to three coats, sanding lightly with 220-grit between coats. Three coats of polyurethane on a wall panel will resist cleaning, minor scuffs, and humidity for 10 or more years.
Painting for a Contemporary Finish
For painted panels — especially popular for the batten-and-board and grid styles — prime first with a bonding primer, especially on MDF, which absorbs paint aggressively. One coat of primer followed by two coats of paint in a semi-gloss or satin finish gives a clean, durable result. Use a mini foam roller for flat panel faces and a brush for trim edges. Roll paint in the same direction for a consistent texture. Let each coat dry fully — at least 4 hours — before applying the next. Rushing between coats causes lifting and peeling.
Natural Oil and Wax Finishes
Hardwax oils (products like Rubio Monocoat or Osmo Polyx) penetrate into wood fibers rather than sitting on the surface like polyurethane. They give a very natural, matte look that shows the wood's texture. Application is simple — wipe on, work in, wipe off excess. One coat is often sufficient. The trade-off is that hardwax-oiled surfaces require periodic reapplication (every 3 to 5 years in residential use) and are less resistant to water and hard impacts than polyurethane. They're ideal for premium wood veneer panels where preserving the most natural feel is the priority.
Common Mistakes and How to Avoid Them
These are the errors that show up most often in DIY paneling projects — and each one is entirely preventable.
- Skipping acclimation: Boards installed without acclimating will move after installation. Gaps open up in dry winter air, or boards buckle when humidity rises. Always let wood acclimate in the room for 48 to 72 hours minimum.
- Not checking for level frequently: Check level every 3 to 4 boards, not just at the start. Small errors compound. A 2-foot level is not enough — use a 4-foot level or a laser.
- Relying on adhesive alone: Construction adhesive alone is not enough for heavy boards on smooth drywall. Always combine adhesive with mechanical fasteners into studs. Panels that fall off a wall are a safety hazard, not just an inconvenience.
- Ignoring the ceiling and floor gap: Leave a 1/8-inch gap at the ceiling and floor lines. These gaps, covered by trim, allow for slight movement without the panels pressing and bowing.
- Using the wrong blade for veneer cuts: A coarse saw blade will tear veneer faces. Always use a fine-tooth blade (60+ teeth) for any cut on veneer panel surfaces.
- Finishing after installation without protecting adjacent surfaces: Staining and finishing in place means drips on the floor and ceiling. If possible, pre-finish boards before installation, then touch up seams and nail holes after. This produces a dramatically cleaner result.

Design Ideas for Different Room Types
The same installation technique adapts to wildly different aesthetics depending on wood species, finish, and pattern. Here are specific applications that work well in different spaces:
Living Room Accent Wall
A full-height wood veneer wall panel installation in white oak with a natural hardwax oil finish creates a warm, contemporary focal point. Position it on the wall the sofa faces. Keep the remaining three walls a neutral linen or greige — the wood wall does all the visual work. White oak veneer panels run $15 to $22 per square foot and transform an ordinary living room into something that looks architecturally designed.
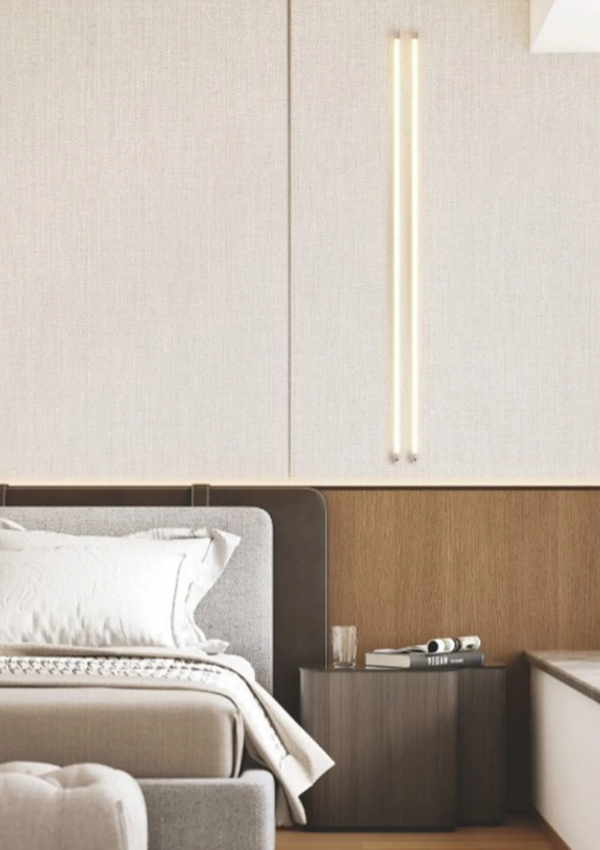
Bedroom Headboard Wall
Horizontal shiplap boards in a warm honey tone behind the bed create a cozy, enveloping feel. Run them full width (not just behind the headboard) for a more architectural effect. A medium-width board — 5 to 6 inches — works best at this scale. The horizontal lines subtly widen the space, which feels particularly good in narrower bedrooms.
Home Office Feature Wall
A painted batten-and-board grid panel in deep navy, charcoal, or forest green creates a professional, distinctive background for video calls while making the room feel finished and thoughtful. This design uses MDF battens (¼ to ½ inch thick, 1.5 to 2.5 inches wide) adhered over a painted MDF panel in a grid pattern. Total material cost for a 10x9-foot wall is typically $150 to $300, making it one of the most cost-effective high-impact wall treatments available.
Bathroom and High-Humidity Spaces
Wood panels in bathrooms require specific attention. Use moisture-resistant MDF as your substrate for any veneer application, and seal all six sides of every board or panel — including cut edges and the back — with an oil-based primer or sealer before installation. Apply at least three coats of water-based polyurethane on the face. In shower areas, real wood panels are not appropriate — tile or stone are the correct materials there. But for the broader bathroom wall area away from direct water, properly sealed teak, cedar, or waterproof wood veneer wall paneling performs reliably.
How Long Does the Project Take and What Does It Cost?
Realistic time and cost estimates help you plan properly and avoid the frustration of projects that drag on or go over budget.
| Panel Type | Material Cost | Prep Time | Install Time | Finishing Time |
|---|---|---|---|---|
| Pine Shiplap Boards | $350–$900 | 2–3 hours | 4–6 hours | 3–5 hours |
| Wood Veneer Wall Paneling (white oak) | $1,100–$2,700 | 2–4 hours | 3–5 hours | 2–4 hours |
| MDF Batten-and-Board Grid | $150–$300 | 2 hours | 5–8 hours | 4–6 hours |
| Reclaimed Barnwood | $900–$2,200 | 3–5 hours | 6–10 hours | 1–2 hours |
Finishing time assumes pre-finishing boards before installation where possible. If finishing in place, add 30% to 50% more time for masking, protecting floors, and working in a more constrained environment. These estimates assume a DIYer with basic tool experience — a first-time woodworker should add 30% to 50% to install and finishing times.
Maintaining Wood Wall Panels Over Time
Well-installed and properly finished wood panels need very little maintenance, but a few practices extend their life significantly.
Clean panels with a slightly damp microfiber cloth — never saturate wood with water. For polyurethane-finished surfaces, a diluted solution of dish soap and water handles most marks. For oil-finished veneer panels, use a cleaning product recommended by the oil manufacturer (Rubio Monocoat has its own cleaner, for instance) to avoid stripping the finish.
Inspect sealed edges annually — especially in kitchens and bathrooms — for any signs of peeling or moisture infiltration. Touch up with a fresh coat of the original finish before any damage progresses. Keep indoor humidity levels between 35% and 55% year-round to prevent excessive wood movement. A whole-home humidifier in winter and air conditioning in summer typically handles this automatically.
For dents or scratches, shallow damage in solid wood can often be raised with a damp cloth and a warm iron (the steam causes the wood fibers to swell back up). Deeper gouges need a matching wood filler, sanding, and spot refinishing. On veneer surfaces, be cautious — the veneer layer is thin, and aggressive sanding can burn through to the substrate.


 ++86-18906857262 / ++86-13754347028
 No.49, Tunnan Industrial Zone, Daohui Street, Shangyu District, Shaoxing City, Zhejiang Province, China